Quantcast
Channel: Android Explorations
Viewing all 50 articles
Browse latest View live

Hardware-accelerated disk encryption in Android 5.1

$
0
0
In a previous post we looked at disk encryption enhancements introduced in Android 5.0. That article was written based on the Lollipop preview release, before the platform source code was available, and while the post got most of the details about hardware-backed key protection right (the official documentation has since been released), it appears that it was overly optimistic in expecting that high-end Lollipop devices will ship with hardware-accelerated disk encryption. Android 5.0 did come with disk encryption enabled by default (at least on Nexus devices), but FDE also brought some performance problems, and many Android enthusiasts rushed to disable it. While slower disk access generally doesn't affect perceived performance when using a particular app, longer load times can add up and result in slower switching between apps, as well as longer boot times. In order to improve performance without sacrificing device security Android 5.1 integrated support for hardware-accelerated disk encryption on devices that provide dedicated cryptographic hardware, such as the Nexus 6. Unfortunately, this feature ended up disabled in the current Android release, but hopefully will be turned back on in a future release.

This post will look into the implementation of hardware-backed disk encryption on the Nexus 6, show how it improves performance, and finally describe some of the problems of the current implementation.

Kernel crypto

As previously discussed, Android's FDE implementation is based on the dm-crypt device-mapper target. As such, it performs cryptographic operations via the interfaces provided by the Linux kernel crypto API. The kernel crypto API defines a standard, extensible interface to ciphers and other data transformations implemented in the kernel (or as loadable modules). The API supports symmetric ciphers, AEAD ciphers, message digests and random number generators, collectively referred to as 'transformations'. All transformations have a name and a priority, as well as additional properties that describe their block size, supported key sizes, and so on.  For example, a desktop Linux system you may support the following:

$ cat /proc/crypto
...
name : aes
driver : aes-generic
module : kernel
priority : 100
refcnt : 1
selftest : passed
type : cipher
blocksize : 16
min keysize : 16
max keysize : 32
...
name : aes
driver : aes-aesni
module : kernel
priority : 300
refcnt : 1
selftest : passed
type : cipher
blocksize : 16
min keysize : 16
max keysize : 32

name : aes
driver : aes-asm
module : kernel
priority : 200
refcnt : 1
selftest : passed
type : cipher
blocksize : 16
min keysize : 16
max keysize : 32
...

Here we see three different implementations of the aes transformation, all built into the kernel, but with different priorities. When creating an instance of a particular transformation clients of the crypto API only specify its name and the kernel automatically returns the one with the highest priority. In this particular example, the aes-aesni implementation (which takes advantage of the AES-NI instruction set available on recent x86 CPUs) will be returned. New implementations can be added using the crypto_register_alg() and crypto_register_algs() functions.

The API provides single-block ciphers and hashes, which can be combined in order to provide higher-level cryptographic constructs via 'templates'. For example, AES in CBC mode is specified with the cbc(aes) template. Templates can be nested in order to request composite transformations that include more than one cryptographic primitive.

The API defines synchronous and asynchronous versions of cryptographic operations. Asynchronous operations return immediately and deliver their result via a callback, while synchronous operations block until the result is available. The crypto API also provides a user space interface via a dedicated socket type, AF_ALG.

Accelerating dm-crypt

dm-crypt parses the cipher specification (aes-cbc-essiv:sha256 in stock Android) passed as part of its mapping table and instantiates the corresponding transforms via the kernel crypto API. Thus in order to have dm-crypt use hardware acceleration, one has to either register a hardware-backed AES implementation with a high priority (which may affect other kernel services), or use a unique AES transformation name and change the mapping table accordingly.

Pretty much all SoC's used in current Android devices come with some sort of AES-capable hardware, usually in order to implement efficient DRM. OMAP devices provide ecb(aes), cbc(aes), and ctr(aes) implementations (in omap-aes.c) backed by the OMAP Crypto Engine; Tegra devices provide ecb(aes), cbc(aes), and ofb(aes) (in tegra-aes.c) backed by NVIDIA's bitstream engine. ARMv8 devices offer an AES implementation which takes advantage of the the dedicated aese, aesd, and aesmc instructions of the CPU. If the hardware-backed AES transformations available on these devices have higher priority than the corresponding software implementations, dm-crypt will automatically use them and take advantage of any acceleration (offloading to dedicated hardware/co-processor) they provide.

Qualcomm crypto engine

Recent (and probably older, too) Qualcomm Snapdragon SoC include a dedicated cryptographic module which provides hardware acceleration for commonly used algorithms such as AES and SHA-256. While publicly released details are quite scarce, the Snapdragon 805 and 810 SoC's have been FIPS 140-2 certified and certification documents offer some insight into the implementation and supported features. 

The cryptographic hardware in the 805 is officially called the 'Crypto 5 Core' and provides hardware implementations of DES, 3DES and AES in various modes (ECB, CBC, etc.), authenticated encryption (AEAD), SHA-1 and SHA-256, HMAC, a hardware-seeded random number generator, as well as support for mobile communication algorithms like Kasumi and snow-3G. 

The services provided by the crypto core are integrated into the Linux kernel in the form of several drivers: qce50 (QTI crypto engine), qcrypto (kernel crypto API driver), and qcedev (for user-space applications). qcrypto and qcedev both depend on qce50, but provide different interfaces. The actual crypto hardware can be accessed either only from user space or kernel space at the same time, therefore the documentation recommends that only one of the interfaces be enabled. Here's the driver structure diagram from the kernel documentation:


The qcrypto driver registers the following transformations with the kernel crypto API:

$ grep -B1 -A2 qcrypto  /proc/crypto|grep -v kernel
name : rfc4309(ccm(aes))
driver : qcrypto-rfc4309-aes-ccm
priority : 300
--
name : ccm(aes)
driver : qcrypto-aes-ccm
priority : 300
--
name : hmac(sha256)
driver : qcrypto-hmac-sha256
priority : 300
--
name : hmac(sha1)
driver : qcrypto-hmac-sha1
priority : 300
--
name : authenc(hmac(sha1),cbc(des3_ede))
driver : qcrypto-aead-hmac-sha1-cbc-3des
priority : 300
--
name : authenc(hmac(sha1),cbc(des))
driver : qcrypto-aead-hmac-sha1-cbc-des
priority : 300
--
name : authenc(hmac(sha1),cbc(aes))
driver : qcrypto-aead-hmac-sha1-cbc-aes
priority : 300
--
name : qcom-sha256
driver : qcrypto-sha256
priority : 300
--
name : qcom-sha1
driver : qcrypto-sha1
priority : 300
--
name : qcom-xts(aes)
driver : qcrypto-xts-aes
priority : 300
--
name : qcom-cbc(des3_ede)
driver : qcrypto-cbc-3des
priority : 300
--
name : qcom-ecb(des3_ede)
driver : qcrypto-ecb-3des
priority : 300
--
name : qcom-cbc(des)
driver : qcrypto-cbc-des
priority : 300
--
name : qcom-ecb(des)
driver : qcrypto-ecb-des
priority : 300
--
name : qcom-ctr(aes)
driver : qcrypto-ctr-aes
priority : 300
--
name : qcom-cbc(aes)
driver : qcrypto-cbc-aes
priority : 300
--
name : qcom-ecb(aes)
driver : qcrypto-ecb-aes
priority : 300

As you can see some of them are registered with a generic transformation name (e.g., hmac(sha1)), while some have the qcom- prefix. Whether to use the generic or driver-specific name is controlled by the device tree configuration. The interesting algorithm in the list above is qcom-xts(aes). Unlike CBC and CTR, the XTS cipher mode is not a generic chaining mode, but has been specifically developed for the purposes of block-based disk encryption. XTS works on wide blocks which map nicely to disk sectors (or blocks) and efficiently generates a 'tweak' key, different for each encrypted block by using the sector number and offset into the sector as variable inputs. Compared to AES-CBC-ESSIV XTS is more complex to implement, but less malleable (even though it is not an authenticated cipher), and is thus preferable.

The Linux kernel crypto API does support XTS, so technically dm-crypt could take advantage of the hardware-backed AES-XTS implementation in the Qualcomm CE without modifications. However, dm-crypt is designed to operate on 512-byte sectors and if used as is with the Qualcomm CE would result in many small requests to the cryptographic hardware, which is rather inefficient. Instead of trying to modify or tune dm-crypt, Qualcomm added a new device-mapper target for use with its SoC's: dm-req-crypt.

Introducing dm-req-crypt

dm-req-crypt works with encryption requests of up to 512KB and sends asynchronous encryption/decryption requests to the Snapdragon cryptographic module via the kernel crypto API interface, implemented by the qcrypto driver. Without going into the intricacies of kernel programming, here are the most important calls it uses to encrypt disk blocks:

...
tfm = crypto_alloc_ablkcipher("qcom-xts(aes)", 0, 0);
req = ablkcipher_request_alloc(tfm, GFP_KERNEL);
ablkcipher_request_set_callback(req, CRYPTO_TFM_REQ_MAY_BACKLOG,
req_crypt_cipher_complete, &result);
crypto_ablkcipher_clear_flags(tfm, ~0);
crypto_ablkcipher_setkey(tfm, NULL, KEY_SIZE_XTS);

memset(IV, 0, AES_XTS_IV_LEN);
memcpy(IV, &clone->__sector, sizeof(sector_t));

ablkcipher_request_set_crypt(req, req_sg_in, req_sg_out,
total_bytes_in_req, (void *) IV);

rc = crypto_ablkcipher_encrypt(req);
...

This code first requests an asynchronous implementation of the qcom-xts(aes) transform, sets the encryption key, then allocates and sets up a request structure, and finally starts the encryption operation by calling the crypto_ablkcipher_encrypt() function.  The important bit here is that the input and output buffers (scatterlists) req_sg_in and req_sg_out can hold up to 1024 sectors, whereas the dm-crypt always encrypts a single sector at a time. Another important detail is that encryption key passed to the AES-XTS transformation object via crypto_ablkcipher_setkey() is actually NULL. We'll address this later in our discussion of Android 5.1's FDE implementation.

Integrating dm-req-crypt

As with dm-crypt, disk encryption and mounting is handled by the cryptfs module of the vold daemon. Because most of the heavy lifting is done by the device mapper kernel module, changing vold to support dm-req-crypt is fairly straightforward. The type of disk encryption stored in the crypto footer structure is changed to aes-xts, and the device mapper target used to create a DM device is changed from crypt (which maps to the dm-crypt driver) to req-crypt. These changes are triggered at build time by setting the CONFIG_HW_DISK_ENCRYPTION macro.

The disk encryption key passed to the kernel (also called 'master key') is generated, encrypted and stored exactly in the same way as with dm-crypt (see the diagram at the end of this post for details). When an encrypted device is booted, the PIN or password entered by the user is run through scrypt, then signed with a hardware-bound RSA key, the result is run through scrypt again to derive the key encryption key (KEK) and IV, which are in turn used to decrypt the master key stored in the crypto footer. The master key is then passed to the device mapper driver as part of the mapping table via an ioctl() call. However, the dm-req-crypt implementation completely ignores the passed cipher string, encryption key and IV offset, and only uses the device path and start sector parameters. As we saw in the previous section, the key passed to the kernel crypto API is also NULL, so where does the actual disk encryption key come from?

Key management

The key management implementation is unfortunately proprietary and depends on the Qualcomm Secure Execution Environment (QSEE, also used to implemented the hardware-backed keystore). That said, the glue code that integrates it with vold, as well as the kernel driver are open source, so we can get a fairly good idea of how the system works. The disk encryption key is set, updated and cleared using the cryptfs_hw glue library. This library merely loads several functions from the proprietary libQSEEComAPI.so library using dlopen() and provides wrappers around them. For example, the disk encryption key is set by calling set_hw_device_encryption_key(), which in turn calls QSEECom_update_key_user_info() from the proprietary library. This function send commands to the secure OS via the qseecom kernel driver which is visible to user space as the /dev/qseecom device.

Generating a disk encryption key causes the qseecom driver to request loading a trusted app in the secure OS, and then sends the QSEOS_GENERATE_KEY command, which kicks off key generation. Generated keys a appear to be stored on the ssd ('secure storage device'?) partition which points to /dev/block/mmcblk0p34 on the Nexus 6. After the key is generated, it is loaded into the hardware crypto engine using the QSEOS_SET_KEY command and can henceforth be used for encryption or decryption.

Using HW-accelerated FDE

As discussed in the 'Integrating dm-req-crypt' section, two things are needed to enable hardware-accelerated disk encryption: a vold binary with dm-req-crypt support and the libcryptfs_hw library. And, of course, all of the proprietary bits and pieces that make up the QSEE need to be in place. Thus it is easier to start with a stock 5.1 image, rather than build one from AOSP, because some of the required proprietary binaries seem to be missing from the officially released tarballs. Once everything is in place, encryption works exactly as before: if the fstab.shamu file includes the forceencrypt flag, the device will be encrypted on first boot, otherwise you need to kick off encryption from Settings->Security->Encrypt phone. One thing to note is that there is no way to transition a dm-crypt encrypted partition to dm-req-crypt, so if the device is already encrypted, you need to wipe the userdata partition first. After the encryption completes, the crypto footer (in the metadata partition on the N6) will look like this:

Android FDE crypto footer
-------------------------
Magic : 0xD0B5B1C4
Major Version : 1
Minor Version : 3
Footer Size : 2320 bytes
Flags : 0x00000004
Key Size : 128 bits
Failed Decrypts : 0
Crypto Type : aes-xts
Encrypted Key : CC43B0AE14BF27BAFE4709A102A96140
Salt : 1BB69D5DE1132F15D024E65370C29F33
KDF : scrypt+keymaster
N_factor : 15 (N=32768)
r_factor : 3 (r=8)
p_factor : 1 (p=2)
crypt type : PIN
FS size : 55615232
encrypted upto : 0
hash first block : 000000000000000000000000000000...
scrypted IK : 8B6DDC19F047331740B31B0F41E4EC5F...

The important bit here is the crypto type which is set to aes-xts. Because the actual disk encryption key is manged by the crypto engine, all other parameters (encrypted key, salt, etc.) are only used when verifying the user PIN or password. On boot, vold checks the value of the crypto type, and if set to aes-xts, loads the disk encryption key using the cryptfs_hw library, and then initializes the dm-req-crypt device mapper target. From there, the system simply mounts the created dm-0 device as /data, and all reads and writes are decrypted/encrypted transparently.

Performance

As can be expected, hardware-backed disk encryption performs better than software-based dm-crypt implementation. The screenshots below show the actual numbers, as measured by the AndEBenchPro application ('low-tech'dd read/write results are similar).
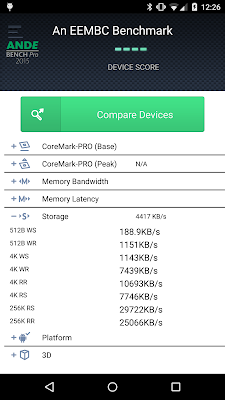
No FDESoftware FDEHardware FDE

As you can see, while disk access when using hardware-backed disk encryption is still about 40% slower than on an unencrypted device, random and sequential reads are almost two times faster compared to the software implementation (when reading 256KB blocks of data: 46.3MB/s vs. 25.1MB/s). So why isn't hardware-backed FDE enabled on current Nexus 6 builds?

Stability problems

Unfortunately, while the current implementation performs pretty well, there are still some problems, especially when the device is in sleep mode. If the devices is in sleep mode for a relatively long period of time, read errors can occur, and the userdata partition may be mounted as read only (which wreaks havoc with the system's content providers); the device may even power off. While a reboot seems to fix the issue, if the the userdata was mounted read-only, the SQLite databases storing system configuration and accounts may get corrupted, which in some cases can only be fixed by a factory reset. Thus, hardware-accelerated disk encryption is unfortunately currently not quite suitable for daily use on the Nexus 6.

The OnePlus One (which has a Snapdragon 801 SoC), running CyanogenOS 12 also includes a dm-req-crypt-based FDE implementation which is enabled out of the box (disk encryption has to be triggered manually though). The FDE implementation one the OnePlus One seems to be quite stable, with comparable performance (50MB/s random read), so hopefully the problem on the Nexus 6 is a software one and can be resolved with a kernel update.

Summary

Disk encryption on Android can be accelerated by adding a kernel crypto API driver which takes advantage of the SoC's cryptographic hardware. This allows block encryption to be offloaded from the main CPU(s), and improves disk access times. Devices based on recent Qualcomm Snapdragon SoC's such as the Nexus 6 and the OnePlus One can take advantage of the SoC's crypto core module using the qcedev and qcrypto kernel drivers. A dedicated disk encryption device mapper target, dm-req-crypt, which batches encryption requests in order to increase throughput is also supported. Additionally, disk encryption keys are managed through a TEE secure app, and thus are not accessible by the Android OS, including the kernel. When using hardware-accelerated FDE disk access  is almost two times faster compared to the software-based dm-crypt implementation, but unfortunately there are some major stability problems on the Nexus 6. Hopefully those will be fixed in the next Android release, and hardware-accelerated disk encryption will be enabled out of the box.

Keystore redesign in Android M

$
0
0
Android M has been announced, and the first preview builds and documentation are now available. The most visible security-related change is, of course, runtime permissions, which impacts almost all applications, and may require significant app redesign in some cases. Permissions are getting more than enough coverage, so this post will look into a less obvious, but still quite significant security change in Android M -- the redesigned keystore (credential storage) and related APIs. (The Android keystore has been somewhat of a recurring topic on this blog, so you might want to check older posts for some perspective.)

New keystore APIs

Android M officially introduces several new keystore features into the framework API, but the underlying work to support them has been going on for quite a while in the AOSP master branch. The most visible new feature is support for generating and using symmetric keys that are protected by the system keystore. Storing symmetric keys has been possible in previous versions too, but required using private (hidden) keystore APIs, and was thus not guaranteed to be portable across versions. Android M introduces a keystore-backed symmetric KeyGenerator, and adds support for the KeyStore.SecretKeyEntry JCA class, which allows storing and retrieving symmetric keys via the standard java.security.KeyStore JCA API. To support this, Android-specific key parameter classes and associated builders have been added to the Android SDK.

Here's how generating and retrieving a 256-bit AES key looks when using the new M APIs:

// key generation
KeyGenParameterSpec.Builder builder = new KeyGenParameterSpec.Builder("key1",
KeyProperties.PURPOSE_ENCRYPT | KeyProperties.PURPOSE_DECRYPT);
KeyGenParameterSpec keySpec = builder
.setKeySize(256)
.setBlockModes("CBC")
.setEncryptionPaddings("PKCS7Padding")
.setRandomizedEncryptionRequired(true)
.setUserAuthenticationRequired(true)
.setUserAuthenticationValidityDurationSeconds(5 * 60)
.build();
KeyGenerator kg = KeyGenerator.getInstance("AES", "AndroidKeyStore");
kg.init(keySpec);
SecretKey key = kg.generateKey();

// key retrieval
KeyStore ks = KeyStore.getInstance("AndroidKeyStore");
ks.load(null);

KeyStore.SecretKeyEntry entry = (KeyStore.SecretKeyEntry)ks.getEntry("key1", null);
key = entry.getSecretKey();

This is pretty standard JCA code, and is in fact very similar to how asymmetric keys (RSA and ECDSA) are handled in previous Android versions. What is new here is, that there are a lot more parameters you can set when generating (or importing a key). Along with basic properties such as key size and alias, you can now specify the supported key usage (encryption/decryption or signing/verification), block mode, padding, etc. Those properties are stored along with the key, and the system will disallow key usage which doesn't match the key's attributes. This allows insecure key usage patterns (ECB mode, or constant IV for CBC mode, for example) to be explicitly forbidden, as well as constraining certain keys to a particular purpose, which is important in a multi-key cryptosystem or protocol. Key validity period (separate for encryption/signing and decryption/verification) can also be specified.

Another major new feature is requiring use authentication before allowing a particular key to be used, and specifying the authentication validity period. Thus, a key that protects sensitive data, can require user authentication on each use (e.g., decryption), while a different key may require only a single authentication per session (say, every 10 minutes).


The newly introduced key properties are available for both symmetric and asymmetric keys. An interesting detail is that apparently trying to use a key is now the official way (Cf. the Confirm Credential sample and related video) to check whether a user has authenticated within a given time period. This quite a roundabout way to verify user presence, especially if you app doesn't make use of cryptography in the first place. The newly introduced FingerprintManager authentication APIs also make use of cryptographic objects, so this may be part of a larger picture, which we have yet to see.

Keystore and keymaster implementation

On a high level, key generation and storage work the same as in previous versions: the system keystore daemon provides an AIDL interface, which framework classes and system services use to generate and manage keys. The keystore AIDL has gained some new, more generic methods, as well support for a 'fallback' implementation but is mostly unchanged.

The keymaster HAL and its reference implementation have, however, been completely redesigned. The 'old' keymaster HAL is retained for backward compatibility as version 0.3, while the Android M version has been bumped to 1.0, and offers a completely different interface. The new interface allows for setting fine-grained key properties (also called 'key characteristics' internally), and supports breaking up cryptographic operations that manipulate data of unknown or large size into multiple steps using the familiar begin/update/finish pattern. Key properties are stored as a series of tags along with the key, and form an authorization set when combined. AOSP includes a pure software reference keymaster implementation which implements cryptographic operations using OpenSSL and encrypts key blobs using a provided master key. Let's take a more detailed look at how the software implementations handles key blobs.

Key blobs

Keymaster v1.0 key blobs are wrapped inside keystore blobs, which are in turn stored as files in /data/misc/keystore/user_X, as before (where X is the Android user ID, starting with 0 for the primary user). Keymaster blobs are variable size and employ a tag-length-value (TLV) format internally. They include a version byte, a nonce, encrypted key material, a tag for authenticating the encrypted key, as well as two authorization sets (enforced and unenforced), which contain the key's properties. Key material is encrypted using AES in OCB mode, which automatically authenticates the cipher text and produces an authentication tag upon completion. Each key blob is encrypted with a dedicated key encryption key (KEK), which is derived by hashing a binary tag representing the key's root of trust (hardware or software), concatenated with they key's authorization sets. Finally, the resulting hash value is encrypted with the master key to derive the blob's KEK. The current software implementation deliberately uses a 128-bit AES zero key, and employs a constant, all-zero nonce for all keys. It is expected that the final implementation will either use a hardware-backed master-key, or be completely TEE-based, and thus not directly accessible from Android.

The current format is quite easy to decrypt, and while this will likely change in the final M version, in the mean time you can decrypt keymaster v1.0 blobs using the keystore-decryptor tool. The program also supports key blobs generated by previous Android versions, and will try to parse (but not decrypt) encrypted RSA blobs on Qualcomm devices. Note that the tool may not work on devices that use custom key blob formats or otherwise customize the keystore implementation. keystore-decryptor takes as input the keystore's .masterkey file, the key blob to decrypt, and a PIN/password, which is the same as the device's lockscreen credential. Here's a sample invocation:

$ java -jar ksdecryptor-all.jar .masterkey 10092_USRPKEY_ec_key4 1234
master key: d6c70396df7bfdd8b47913485dc0a885

EC key:
s: 22c18a15163ad13f3bbeace52c361150 (254)
params: 1.2.840.10045.3.1.7
key size: 256
key algorithm: EC
authorizations:

Hidden tags:
tag=900002C0 TAG_KM_BYTES bytes: 5357 (2)

Enforced tags:

Unenforced tags:
tag=20000001 TAG_KM_ENUM_REP 00000003
tag=60000191 TAG_KM_DATE 000002DDFEB9EAF0: Sun Nov 24 11:10:25 JST 2069
tag=10000002 TAG_KM_ENUM 00000003
tag=30000003 TAG_KM_INT 00000100
tag=700001F4 TAG_KM_BOOL 1
tag=20000005 TAG_KM_ENUM_REP 00000000
tag=20000006 TAG_KM_ENUM_REP 00000001
tag=700001F7 TAG_KM_BOOL 1
tag=600002BD TAG_KM_DATE FFFFFFFFBD84BAF0: Fri Dec 19 11:10:25 JST 1969
tag=100002BE TAG_KM_ENUM 00000000

Per-key authorization

As discussed in the 'New keystore APIs' section, the setUserAuthenticationRequired() method of the key parameter builder allows you to require that the user authenticates before they are authorized to use a certain key (not unlike iOS's Keychain). While this is not a new concept (system-wide credentials in Android 4.x require access to be granted per-key), the interesting part is how it is implemented in Android M. The system keystore service now holds an authentication token table, and a key operation is only authorized if the table contains a matching token. Tokens include an HMAC and thus can provide a strong guarantee that a user has actually authenticated at a given time, using a particular authentication method.

Authentication tokens are now part of Android's HAL, and currently support two authentication methods: password and fingerprint. Here's how tokens are  defined:

typedef enum {
HW_AUTH_NONE = 0,
HW_AUTH_PASSWORD = 1 << 0,
HW_AUTH_FINGERPRINT = 1 << 1,
HW_AUTH_ANY = UINT32_MAX,
} hw_authenticator_type_t;

typedef struct __attribute__((__packed__)) {
uint8_t version; // Current version is 0
uint64_t challenge;
uint64_t user_id; // secure user ID, not Android user ID
uint64_t authenticator_id; // secure authenticator ID
uint32_t authenticator_type; // hw_authenticator_type_t, in network order
uint64_t timestamp; // in network order
uint8_t hmac[32];
} hw_auth_token_t;

Tokens are generated by a newly introduced system component, called the gatekeeper. The gatekeeper issues a token after it verifies the user-entered password against a previously enrolled one. Unfortunately, the current AOSP master branch does not include the actual code that creates these tokens, but there is a base class which shows how a typical gatekeeper might be implemented: it computes an HMAC over the all fields of the hw_auth_token_t structure up to hmac using a dedicated key, and stores it in the hmac field. The serialized hw_auth_token_t structure then serves as an authentication token, and can be passed to other components that need to verify if the user is authenticated. Management of the token generation key is implementation-dependent, but it is expected that it is securely stored, and inaccessible to other system applications. In the final gatekeeper implementation the HMAC key will likely be backed by hardware, and the gatekeeper module could execute entirely within the TEE, and thus be inaccessible to Android. The low-level gatekeeper interface is part of Android M's HAL and is defined in hardware/gatekeeper.h.

As can be expected, the current Android M builds do indeed include a gatekeeper binary, which is declared as follows in init.rc:

...
service gatekeeperd /system/bin/gatekeeperd /data/misc/gatekeeper
class main
user system
...

While the framework code that makes use of the gatekeepr daemon is not yet available, it is expected that the Android M keyguard (lockscreen) implementation interacts with the gatekeeper in order to obtain a token upon user authentication, and passes it to the system's keystore service via its addAuthToken() method. The fingerprint authentication module (possibly an alternative keyguard implementation) likely works in the same way, but compares fingerprint scans against a previously enrolled fingerprint template instead of passwords.

Summary

Android M includes a redesigned keystore implementation which allows for fine-grained key usage control, and supports per-key authorization. The new keystore supports both symmetric and asymmetric keys, which are stored on disk as key blobs. Key blobs include encrypted key material, as well as a set of key tags, forming an authorization set. Key material is encrypted with a per-blob KEK, derived from the key's properties and a common master key. The final keystore implementation is expected to use a hardware-backed master key, and run entirely within the confines of the TEE. 

Android M also includes a new system component, called the gatekeeper, which can issue signed tokens to attest that a particular user has authenticated at a particular time. The gatekeeper has been integrated with the current PIN, pattern or password-based lockscreen, and is expected to integrate with fingerprint-based authentication in the final Android M version on supported devices. 

Decrypting Android M adopted storage

$
0
0
One of the new features Android M introduces is adoptable storage. This feature allows external storage devices such as SD cards or USB drives to be 'adopted' and used in the same manner as internal storage. What this means in practice is that both apps and their private data can be moved to the adopted storage device. In other words, this is another take on everyone's (except for widget authors...) favorite 2010 feature -- AppsOnSD. There are, of course, a few differences, the major one being that while AppsOnSD (just like app Android 4.1 app encryption) creates per-app encrypted containers, adoptable storage encrypts the whole device. This short post will look at how adoptable storage encryption is implemented, and show how to decrypt and use adopted drives on any Linux machine.

Adopting an USB drive

In order to enable adoptable storage for devices connected via USB you need to execute the following command in the Android shell (presumably, this is not needed if your device has an internal SD card slot; however there are no such devices that run Android M at present):

$ adb shell sm set-force-adoptable true

Now, if you connect a USB drive to the device's micro USB slot (you can also use an USB OTG cable), Android will give you an option to set it up as 'internal' storage, which requires reformatting and encryption. 'Portable' storage is formatted using VFAT, as before.


After the drive is formatted, it shows up under Device storage in the Storage screen of system Settings. You can now migrate media and application data to the newly added drive, but it appears that there is no option in the system UI that allows you to move applications (APKs).


Adopted devices are mounted via Linux's device-mapper under /mnt/expand/ as can be seen below, and can be directly accessed only by system apps.

$ mount
rootfs / rootfs ro,seclabel,relatime 0 0
...
/dev/block/dm-1 /mnt/expand/a16653c3-... ext4 rw,dirsync,seclabel,nosuid,nodev,noatime 0 0
/dev/block/dm-2 /mnt/expand/0fd7f1a0-... ext4 rw,dirsync,seclabel,nosuid,nodev,noatime 0 0

You can safely eject an adopted drive by tapping on it in the Storage screen, and the choosing Eject from the overflow menu. Android will show a persistent notification that prompts you to reinsert the device once it's removed. Alternatively, you also can 'forget' the drive, which removes it from the system, and should presumably delete the associated encryption key (which doesn't seem to be the case in the current preview build).

Inspecting the drive

Once you've ejected the drive, you can connect it to any Linux box in order to inspect it. Somewhat surprisingly, the drive will be automatically mounted on most modern Linux distributions, which suggests that there is at least one readable partition. If you look at the partition table with fdisk or a similar tool, you may see something like this:

# fdisk /dev/sdb
Disk /dev/sdb: 7811 MB, 7811891200 bytes, 15257600 sectors
Units = sectors of 1 * 512 = 512 bytes
Sector size (logical/physical): 512 bytes / 512 bytes
I/O size (minimum/optimal): 512 bytes / 512 bytes
Disk label type: gpt


# Start End Size Type Name
1 2048 34815 16M unknown android_meta
2 34816 15257566 7.3G unknown android_expand

As you can see, there is a tiny android_meta partition, but the bulk of the device has been assigned to the android_expand partition. Unfortunately, the full source code of Android M is not available, so we cannot be sure how exactly this partition table is created, or what the contents of each partition is. However, we know that most of Android's storage management functionality is implemented in the vold system daemon, so we check if there is any mention of android_expand inside vold with the following command:

$ strings vold|grep -i expand
--change-name=0:android_expand
%s/expand_%s.key
/mnt/expand/%s

Here expand_%s.key suspiciously looks like a key filename template, and we already know that adopted drives are encrypted, so our next step is to look for any similar files in the device's /data partition (you'll need a custom recovery or root access for this). Unsurprisingly, there is a matching file in /data/misc/vold which looks like this:

# ls /data/misc/vold
bench
expand_8838e738a18746b6e435bb0d04c15ccd.key

# ls -l expand_8838e738a18746b6e435bb0d04c15ccd.key

-rw------- 1 root root 16 expand_8838e738a18746b6e435bb0d04c15ccd.key


# od -t x1 expand_8838e738a18746b6e435bb0d04c15ccd.key
0000000 00 01 02 03 04 05 06 07 08 09 0a 0b 0c 0d 0e 0f
0000020

Decrypting the drive

That's exactly 16 bytes, enough for a 128-bit key. As we know, Android's FDE implementation uses an AES 128-bit key, so it's a good bet that adoptable storage uses a similar (or identical) implementation. Looking at the start and end of our android_expand partition doesn't reveal any readable info, nor is it similar to Android's crypto footer, or LUKS's header. Therefore, we need to guess the encryption mode and/or any related parameters. Looking once again at Android's FDE implementation (which is based on the dm-crypt target of Linux's device-mapper), we see that the encryption mode used is aes-cbc-essiv:sha256. After consulting dm-crypt's mapping table reference, we see that the remaining parameters we need are the IV offset and the starting offset of encrypted data. Since the IV offset is usually zero, and most probably the entire android_expand partition (offset 0) is encrypted, the command we need to map the encrypted partition becomes the following:

# dmsetup create crypt1 --table "0 `blockdev --getsize /dev/sdb2` crypt \
aes-cbc-essiv:sha256 00010203040506070809010a0b0c0d0e0f 0 /dev/sdb2 0"

It completes with error, so we can now try to mount the mapped device, again guessing that the file system is most probably ext4 (or you can inspect the mapped device and find the superblock first, if you want to be extra diligent).

# mount -t ext4 /dev/mapper/crypt1 /mnt/1/
# cd /mnt/1
# find ./ -type d
./
./lost+found
./app
./user
./media
./local
./local/tmp
./misc
./misc/vold
./misc/vold/bench

This reveals a very familiar Android /data layout, and you should see any media and app data you've moved to the adopted device. If you copy any files to the mounted device, they should be visible when you mount the drive again in Android.

Storage manager commands

Back in Android, you can use the sm command (probably short for 'storage manager') we showed in the first section to list disks and volumes as shown below:

$ sm list-disks
disk:8,16
disk:8,0

$ sm list-volumes
emulated:8,2 unmounted null
private mounted null
private:8,18 mounted 0fd7f1a0-2d27-48f9-8702-a484cb894a92
emulated:8,18 mounted null
emulated unmounted null
private:8,2 mounted a16653c3-6f5e-455c-bb03-70c8a74b109e

If you have root access, you can also partition, format, mount, unmount and forget disks/volumes. The full list of supported commands is shown in the following listing.

$ sm
usage: sm list-disks
sm list-volumes [public|private|emulated|all]
sm has-adoptable
sm get-primary-storage-uuid
sm set-force-adoptable [true|false]

sm partition DISK [public|private|mixed] [ratio]
sm mount VOLUME
sm unmount VOLUME
sm format VOLUME

sm forget [UUID|all]

Most features are also available from the system UI, but sm allows you to customize the ratio of the android_meta and android_expand partitions, as well as to create 'mixed' volumes.

Summary

Android M allows for adoptable storage, which is implemented similarly to internal storage FDE -- using dm-crypt with a per-volume, static 128-bit AES key, stored in /data/misc/vold/. Once the key is extracted from the device, adopted storage can be mounted and read/written on any Linux machine. Adoptable storage encryption is done purely in software (at least in the current preview build), so its performance is likely comparable to encrypted internal storage on devices that don't support hardware-accelerated FDE.

Password storage in Android M

$
0
0
While Android has received a number of security enhancements in the last few releases, the lockscreen (also know as the keyguard) and password storage have remained virtually unchanged since the 2.x days, save for adding multi-user support. Android M is finally changing this with official support for fingerprint authentication. While the code related to biometric support is currently unavailable, some of the new code responsible for password storage and user authentication is partially available in AOSP's master branch. Examining the runtime behaviour and files used by the current Android M preview reveals that some password storage changes have already been deployed. This post will briefly review how password storage has been implemented in pre-M Android versions, and then introduce the changes brought about by Android M.

Keyguard unlock methods

Stock Android provides three keyguard unlock methods: pattern, PIN and password (Face Unlock has been rebranded to 'Trusted face' and moved to the proprietary Smart Lock extension, part of Google Play Services). The pattern unlock is the original Android unlock method, while PIN and password (which are essentially equivalent under the hood) were added in version 2.2. The following sections will discuss how credentials are registered, stored and verified for the pattern and PIN/password unlock methods.

Pattern unlock

Android's pattern unlock is entered by joining at least four points on a 3×3 matrix (some custom ROMs allow a bigger matrix). Each point can be used only once (crossed points are disregarded) and the maximum number of points is nine. The pattern is internally converted to a byte sequence, with each point represented by its index, where 0 is top left and 8 is bottom right. Thus the pattern is similar to a PIN with a minimum of four and maximum of nine digits which uses only nine distinct digits (0 to 8). However, because points cannot be repeated, the number of variations in an unlock pattern is considerably lower compared to those of a nine-digit PIN. As pattern unlock is the original and initially sole unlock method supported by Android, a fair amount of research has been done about it's (in)security. It has been shown that patterns can be guessed quite reliably using the so called smudge attack, and that the total number of possible combinations is less than 400 thousand, with only 1624 combinations for 4-dot (the default) patterns.


Android stores an unsalted SHA-1 hash of the unlock pattern in /data/system/gesture.key or /data/system/users/<user ID>/gesture.key on multi-user devices. It may look like this for the 'Z' pattern shown in the screenshot above.

$ od -tx1 gesture.key
0000000 6a 06 2b 9b 34 52 e3 66 40 71 81 a1 bf 92 ea 73
0000020 e9 ed 4c 48

Because the hash is unsalted, it is easy to precompute the hashes of all possible combinations and recover the original pattern instantaneously. As the number of combinations is fairly small, no special indexing or file format optimizations are required for the hash table, and the grep and xxd commands are all you need to recover the pattern once you have the gesture.key file.

$ grep `xxd -p gesture.key` pattern_hashes.txt
00010204060708, 6a062b9b3452e366407181a1bf92ea73e9ed4c48

PIN/password unlock

The PIN/password unlock method also relies on a stored hash of the user's credential, however it also uses a 64-bit random, per-user salt. The salt is stored in the locksettings.db SQLite database, along with other settings related to the lockscreen. The password hash is kept in the /data/system/password.key file, which contains a concatenation of the password's SHA-1 and MD5 hash values. The file's contents may look like this:

$ cat password.key && echo
2E704465DB8C3CBFF085D8A5135A6F3CA32D5A2CA4A628AE48E22443250C30A3E1449BD0

Note that the hashes are not nested, but their values are simply concatenated, so if you were to bruteforce the password, you only need to attack the weaker hash -- MD5. Another helpful fact is that in order to enable password auditing, Android stores details about the current PIN/password's format in the device_policies.xml file, which might look like this:

<policies setup-complete="true">
...
<active-password length="6" letters="0" lowercase="0" nonletter="6"
numeric="6" quality="196608" symbols="0" uppercase="0">
</active-password>
</policies>


If you were able to obtain the password.key file, chances are that you would also have the device_policies.xml file. This file gives you enough information to narrow down the search space considerably when recovering the password by specifying a mask or password rules. For example, we can easily recover the following 6-digit pin using John the Ripper (JtR) in about a second by specifying the ?d?d?d?d?d?d mask and using the 'dynamic' MD5 hash format (hashcat has a dedicated Android PIN hash mode), as shown below . An 8-character (?l?l?l?l?l?l?l?l), lower case only password takes a couple of hours on the same hardware.

$ cat lockscreen.txt
user:$dynamic_1$A4A628AE48E22443250C30A3E1449BD0$327d5ce3f570d2eb

$ ./john --mask=?d?d?d?d?d?d lockscreen.txt
Loaded 1 password hash (dynamic_1 [md5($p.$s) (joomla) 128/128 AVX 480x4x3])
Will run 8 OpenMP threads
Press 'q' or Ctrl-C to abort, almost any other key for status
456987 (user)
1g 0:00:00:00 DONE 6.250g/s 4953Kp/s 4953Kc/s 4953KC/s 234687..575297

Android's lockscreen password can be easily reset by simply deleting the gesture.key and password.key files, so you might be wondering what is the point in trying to bruteforce it. As discussed in previous posts, the lockscreen password is used to derive keys that protect the keystore (if not hardware-backed), VPN profile passwords, backups, as well as the disk encryption key, so it might be valuable if trying to extract data from any of these services. And of course, the chance that a particular user is using the same pattern, PIN or password on all of their devices is quite high.

Gatekeeper password storage

We briefly introduced Android M's gatekeeper daemon in the keystore redesign post in relation to per-key authorization tokens. It turns out the gatekeeper does much more than that and is also responsible for registering (called 'enrolling') and verifying user passwords. Enrolling turns a plaintext password into a so called 'password handle', which is an opaque, implementation-dependent byte string. The password handle can then be stored on disk and used to check whether a user-supplied password matches the currently registered handle. While the gatekeeper HAL does not specify the format of password handles, the default software implementation uses the following format:

typedef uint64_t secure_id_t;
typedef uint64_t salt_t;

static const uint8_t HANDLE_VERSION = 2;
struct __attribute__ ((__packed__)) password_handle_t {
// fields included in signature
uint8_t version;
secure_id_t user_id;
uint64_t flags;

// fields not included in signature
salt_t salt;
uint8_t signature[32];

bool hardware_backed;
};

Here secure_id_t is randomly generated, 64-bit secure user ID, which is persisted in the /data/misc/gatekeeper directory in a file named after the user's Android user ID (*not* Linux UID; 0 for the primary user). The signature format is left to the implementation, but AOSP's commit log reveals that it is most probably scrypt for the current default implementation. Other gatekeeper implementations might opt to use a hardware-protected symmetric or asymmetric key to produce a 'real' signature (or HMAC).

Neither the HAL, nor the currently available AOSP source code specifies where password handles are to be stored, but looking through the /data/system directory reveals the following files, one of which happens to be the same size as the password_handle_t structure. This implies that it likely contains a serialized password_handle_t instance.

# ls -l /data/system/*key
-rw------- system system 57 2015-06-24 10:24 gatekeeper.gesture.key
-rw------- system system 0 2015-06-24 10:24 gatekeeper.password.key

That's quite a few assumptions though, so time to verify them by parsing the gatekeeper.gesture.key file and checking if the signature field matches the scrypt value of our lockscreen pattern (00010204060708 in binary representation). We can do so with the following Python code:

$ cat m-pass-hash.py
...
N = 16384;
r = 8;
p = 1;

f = open('gatekeeper.gesture.key', 'rb')
blob = f.read()

s = struct.Struct('<'+'17s 8s 32s')
(meta, salt, signature) = s.unpack_from(blob)
password = binascii.unhexlify('00010204060708');
to_hash = meta
to_hash += password
hash = scrypt.hash(to_hash, salt, N, r, p)

print 'signature %s' % signature.encode('hex')
print 'Hash: %s' % hash[0:32].encode('hex')
print 'Equal: %s' % (hash[0:32] == signature)

$./m-pass-hash.py
signature: 3d1a20985dec4bd937e5040aadb465fc75542c71f617ad090ca1c0f96950a4b8
Hash: 3d1a20985dec4bd937e5040aadb465fc75542c71f617ad090ca1c0f96950a4b8
Equal: True

The program output above leads us to believe that the 'signature' stored in the password handle file is indeed the scrypt value of the blob's version, the 64-bit secure user ID, and the blob's flags field, concatenated with the plaintext pattern value. The scrypt hash value is calculated using the stored 64-bit salt and the scrypt parameters N=16384, r=8, p=1. Password handles for PINs or passwords are calculated in the same way, using the PIN/password string value as input.

With this new hashing scheme patterns and passwords are treated in the same way, and thus patterns are no longer easier to bruteforce. That said, with the help of the device_policies.xml file which gives us the length of the pattern and a pre-computed pattern table, one can drastically reduce the number of patterns to try, as most users are likely to use 4-6 step patterns (about 35,000 total combinations) .

Because Androd M's password hashing scheme doesn't directly use the plaintext password when calculating the scrypt value, optimized password recovery tools such as hashcat or JtR cannot be used directly to evaluate bruteforce cost. It is however fairly easy to build our own tool in order to check how a simple PIN holds against a brute force attack, assuming both the device_policies.xml and gatekeeper.password.key files have been obtained. As can be seen below, a simple Python script that tries all PINs from 0000 to 9999 in order takes about 10 minutes, when run on the same hardware as our previous JtR example (a 6-digit PIN would take about 17 hours with the same program). Compare this to less than a second for bruteforcing a 6-digit PIN for Android 5.1 (and earlier), and it is pretty obvious that the new hashing scheme Android M introduces greatly improves password storage security, even for simple PINs. Of course, as we mentioned earlier, the gatekeeper daemon is part of Android's HAL, so vendors are free to employ even more (or less...) secure gatekeeper implementations.

$ time ./m-pass-hash.py gatekeeper.password.key 4
Trying 0000...
Trying 0001...
Trying 0002...

...
Trying 9997...
Trying 9998...
Trying 9999...
Found PIN: 9999

real 9m46.118s
user 9m6.804s
sys 0m39.107s

Framework API

Android M is still in preview, so framework APIs are hardly stable, but we'll show the gatekeeper's AIDL interface for completeness. In the current preview release it is called IGateKeeperService and look likes this:

interface android.service.gatekeeper.IGateKeeperService {

void clearSecureUserId(int uid);

byte[] enroll(int uid, byte[] currentPasswordHandle,
byte[] currentPassword, byte[] desiredPassword);

long getSecureUserId(int uid);

boolean verify(int uid, byte[] enrolledPasswordHandle, byte[] providedPassword);

byte[] verifyChallenge(int uid, long challenge,
byte[] enrolledPasswordHandle, byte[] providedPassword);
}

As you can see, the interface provides methods for generating/getting and clearing the secure user ID for a particular user, as well as the enroll(), verify() and verifyChallenge() methods whose parameters closely match the lower level HAL interface. To verify that there is a live service that implements this interface, we can try to call the getSecureUserId() method using the service command line utility like so:

$ service call android.service.gatekeeper.IGateKeeperService 4 i32 0
Result: Parcel(00000000 ee555c25 ea679e08 '....%\U...g.')

This returns a Binder Parcel with the primary user's (user ID 0) secure user ID, which matches the value stored in /data/misc/gatekeeper/0 shown below (stored in network byte order).

# od -tx1 /data/misc/gatekeeper/0
37777776644 25 5c 55 ee 08 9e 67 ea
37777776644

The actual storage of password hashes (handles) is carried out by the LockSettingsService (interface ILockSettings), as in previous versions. The service has been extended to support the new gatekeeper password handle format, as well as to migrate legacy hashes to the new format. It is easy to verify this by calling the checkPassword(String password, int userId) method which returns true if the password matches:

# service call lock_settings 11 s16 1234 i32 0
Result: Parcel(00000000 00000000 '........')
# service call lock_settings 11 s16 9999 i32 0
Result: Parcel(00000000 00000001 '........')

Summary

Android M introduces a new system service -- gatekeeper, which is responsible for converting plain text passwords to opaque binary blobs (called password handles) which can be safely stored on disk. The gatekeeper is part of Android's HAL, so it can be modified to take advantage of the device's native security features, such as secure storage or TEE, without modifying the core platform. The default implementation shipped with the current Android M preview release uses scrypt to hash unlock patterns, PINs or passwords, and provides much better protection against bruteforceing than the previously used single-round MD5 and SHA-1 hashes. 

Accessing the embedded secure element in Android 4.x

$
0
0
After discussing credential storage and Android's disk encryption, we'll now look at another way to protect your secrets: the embedded secure element (SE) found in recent devices. In the first post of this three part series we'll give some background info about the SE and show how to use the SE communication interfaces Android 4.x offers. In the second part we'll try sending some actual commands in order to find out more about the SE execution environment. Finally we will discuss Google Wallet and how it makes use of the SE.

What is a Secure Element and why do you want one? 

A Secure Element (SE) is a tamper resistant smart card chip capable of running smart card applications (called applets or cardlets) with a certain level of security and features. A smart card is essentially a minimalistic computing environment on single chip, complete with a CPU, ROM, EEPROM, RAM and I/O port. Recent cards also come equipped with cryptographic co-processors implementing common algorithms such as DES, AES and RSA. Smart cards use various techniques to implement tamper resistance, making it quite hard to extract data by disassembling or analyzing the chip. They come pre-programmed with a  multi-application OS that takes advantage of the hardware's memory protection features to ensure that each application's data is only available to itself. Application installation and (optionally) access is controlled by requiring the use of cryptographic keys for each operation.

The SE can be integrated in mobile devices in various form factors: UICC (commonly known as a SIM card), embedded in the handset or connected to a SD card slot. If the device supports  NFC the SE is usually connected to the NFC chip, making it possible to communicate with the SE wirelessly. 

Smart cards have been around for a while and are now used in applications ranging from pre-paid phone calls and transit ticketing to credit cards and VPN credential storage. Since an SE installed in a mobile device has equivalent or superior capabilities to that of a smart card, it can theoretically be used for any application physical smart cards are currently used for. Additionally, since an SE can host multiple applications, it has the potential to replace the bunch of cards people use daily with a single device. Furthermore, because the SE can be controlled by the device's OS, access to it can be restricted by requiring additional authentication (PIN or passphrase) to enable it. 

So a SE is obviously a very useful thing to have and with a lot of potential, but why would you want to access one from your apps? Aside from the obvious payment applications, which you couldn't realistically build unless you own a bank and have a contract with Visa and friends, there is the possibility of storing other cards you already have (access cards, loyalty cards, etc.) on your phone, but that too is somewhat of a gray area and may requiring contracting the relevant issuing entities. The main application for third party apps would be implementing and running a critical part of the app, such as credential storage or license verification inside the SE to guarantee that it is impervious to reversing and cracking. Other apps that can benefit from being implemented in the SE are One Time Password (OTP) generators and, of course PKI credential (i.e., private keys) storage. While implementing those apps is possible today with standard tools and technologies, using them in practice on current commercial Android devices is not that straightforward. We'll discuss this in detail the second part of the series, but let's first explore the types of SEs available on mobile devices, and the level of support they have in Android. 

Secure Element form factors in mobile devices

As mentioned in the previous section, SEs come integrated in different flavours: as an UICC, embedded or as plug-in cards for an SD card slot. This post is obviously about the embedded SE, but let's briefly review the rest as well. 

Pretty much any mobile device nowadays has an UICC (aka SIM card, although it is technically a SIM only when used on GSM networks) of some form or another. UICCs are actually smart cards that can host applications, and as such are one form of a SE. However, since the UICC is only connected to the basedband processor, which is separate from the application processor that runs the main device OS, they cannot be accessed directly from Android. All communication needs to go through the Radio Interface Layer (RIL) which is essentially a proprietary IPC interface to the baseband. Communication to the UICC SE is carried out using special extended AT commands (AT+CCHO, AT+CCHC, AT+CGLA as defined by 3GPP TS 27.007), which the current Android telephony manager does not support. The SEEK for Android project provides patches that do implement the needed commands, allowing for communicating with the UICC via their standard SmartCard API, which is a reference implementation of the SIMallianceOpen Mobile API specification. However, as most components that talk directly to the hardware in Android, the RIL consists of an open source part (rild), and a proprietary library (libXXX-ril.so). In order to support communication with the UICC secure element, support for this needs to be added to both to rild and to the underlying proprietary library, which is of course up to hardware vendors. The SEEK project does provide a patch that lets the emulator talk directly to a UICC in an external PC/SC reader, but that is only usable for experiments. While there is some talk of integrating this functionality into stock Android (there is even an empty packages/apps/SmartCardService directory in the AOSP tree), there is currently no standard way to communicate with the UICC SE through the RIL (some commercial devices with custom firmware are reported to support it though).

An alternative way to use the UICC as a SE is using the Single Wire Protocol (SWP) when the UICC is connected to a NFC controller that supports it. This is the case in the Nexus S, as well as the Galaxy Nexus, and while this functionality is supported by the NFC controller drivers, it is disabled by default. This is however a software limitation, and people have managed to patch AOSP source to get around it and successfully communicate with UICC. This has the greatest potential to become part of stock Android, however, as of the current release (4.1.1), it is still not available. 

Another form factor for an SE is an Advanced Security SD card (ASSD), which is basically an SD card with an embedded SE chip. When connected to an Android device with and SD card slot, running a SEEK-patched Android version, the SE can be accessed via the SmartCard API. However, Android devices with an SD card slot are becoming the exceptions rather than the norm, so it is unlikely that ASSD Android support will make it to the mainstream.

And finally, there is the embedded SE. As the name implies, an embedded SE is part of the device's mainboard, either as a dedicated chip or integrated with the NFC one, and is not removable. The first Android device to feature an embedded SE was the Nexus S, which also introduced NFC support to Android. Subsequent Nexus-branded devices, as well as other popular handsets have continued this trend. The device we'll use in our experiments, the Galaxy Nexus, is built with NXP's PN65N chip, which bundles a NFC radio controller and an SE (P5CN072, part of NXP's SmartMX series) in a single package (a diagram can be found here).

NFC and the Secure Element

NFC and the SE are tightly integrated in Android, and not only because they share the same silicon, so let's say a few words about NFC. NFC has three standard modes of operation: 
  • reader/writer (R/W) mode, allowing for accessing external NFC tags 
  • peer-to-peer (P2P) mode, allowing for data exchange between two NFC devices 
  • card emulation (CE) mode, which allows the device to emulate a traditional contactless smart card 
What can Android do in each of these modes? The R/W mode allows you to read NDEF tags and  contactless cards, such as some transport cards. While this is, of course, useful, it essential turns your phone into a glorified card reader. P2P mode has been the most demoed and marketed one, in the form of Android Beam. This is only cool the first couple of times though, and since the API only gives you higher-level access to the underlying P2P communication protocol, its applications are currently limited. CE was not available in the initial Gingerbread release, and was introduced later in order to support Google Wallet. This is the NFC mode with the greatest potential for real-life applications. It allows your phone to be programmed to emulate pretty much any physical contactless card, considerably slimming down your physical wallet in the process.

The embedded SE is connected to the NFC controller through a SignalIn/SignalOut Connection (S2C, standardized as NFC-WI) and has three modes of operation: off, wired and virtual mode. In off mode there is no communication with the SE. In wired mode the SE is visible to the Android OS as if it were a contactless smartcard connected to the RF reader. In virtual mode the SE is visible to external readers as if the phone were a contactless smartcard. These modes are naturally mutually exclusive, so we can communicate with the SE either via the contactless interface (e.g., from an external reader), or through the wired interface (e.g., from an Android app). This post will focus on using the wired mode to communicate with the SE from an app. Communicating via NFC is no different than reading a physical contactless card and we'll touch on it briefly in the last post of the series.

Accessing the embedded Secure Element

This is a lot of (useful?) information, but we still haven't answered the main question of this entry: how can we access the embedded SE? The bad news is that there is no public Android SDK API for this (yet). The good news is that accessing it in a standard and (somewhat) officially supported way is possible in current Android versions.

Card emulation, and consequently, internal APIs for accessing the embedded SE were introduced in Android 2.3.4, and that is the version Google Wallet launched on. Those APIs were, and remain, hidden from SDK applications. Additionally using them required system-level permissions (WRITE_SECURE_SETTINGS or NFCEE_ADMIN) in 2.3.4 and subsequent Gingerbread releases, as well as in the initial Ice Cream Sandwich release (4.0, API Level 14). What this means is that only Google (for Nexus) devices, and mobile vendors (for everything else) could distribute apps that use the SE, because they need to either be part of the core OS, or be signed with the platform keys, controlled by the respective vendor. Since the only app that made use of the SE was Google Wallet, which ran only on Nexus S (and initially on a single carrier), this was good enough. However, it made it impossible to develop and distribute an SE app without having it signed by the platform vendor. Android 4.0.4 (API Level 15) changed that by replacing the system-level permission requirement with signing certificate (aka, 'signature' in Android framework terms) whitelisting at the OS level. While this still requires modifying core OS files, and thus vendor cooperation, there is no need to sign SE applications with the vendor key, which greatly simplifies distribution. Additionally, since the whiltelist is maintained in a file, it can easily be updated using an OTA to add support for more SE applications.

In practice this is implemented by the NfceeAccessControl class and enforced by the system NfcService. NfceeAccessControl reads the whilelist from /etc/nfcee_access.xml which is an XML file that stores a list of signing certificates and package names that are allowed to access the SE. Access can be granted both to all apps signed by a particular certificate's private key (if no package is specified), or to a single package (app) only. Here's how the file looks like:

<?xml version="1.0" encoding="utf-8"?>
<resources xmlns:xliff="urn:oasis:names:tc:xliff:document:1.2">
<signer android:signature="30820...90">
<package android:name="org.foo.nfc.app">
</package></signer>
</resources>

This would allow SE access to the 'org.foo.nfc.app' package, if it is signed by the specified signer. So the first step to getting our app to access the SE is adding its signing certificate and package name to the nfcee_access.xml file. This file resides on the system partition (/etc is symlinked to /system/etc), so we need root access in order to remount it read-write and modify the file. The stock file already has the Google Wallet certificate in it, so it is a good idea to start with that and add our own package, otherwise Google Wallet SE access would be disabled. The 'signature' attribute is a hex encoding of the signing certificate in DER format, which is a pity since that results in an excessively long string (a hash of the certificate would have sufficed) . We can either add a <debug/> element to the file, install it, try to access the SE and get the string we need to add from the access denied exception, or simplify the process a bit by preparing the string in advance. We can get the certificate bytes in hex format with a command like this:

$ keytool -exportcert -v -keystore my.keystore -alias my_signing_key \
-storepass password|xxd -p -|tr -d '\n'

This will print the hex string on a single line, so you might want to redirect it to a file for easier copying. Add a new <signer> element to the stock file, add your app's package name and the certificate hex string, and replace the original file in /etc/ (backups are always a good idea). You will also need to reboot the device for the changes to take effect, since file is only read when the NfcService starts.

As we said, there are no special permissions required to access the SE in ICS (4.0.3 and above) and Jelly Bean (4.1), so we only need to add the standard NFC permission to our app's manifest. However, the library that implements SE access is marked as optional, and to get it loaded for our app, we need to mark it as required in the manifest with the <uses-library> tag. The AndroidManifest.xml for the app should look something like this:

<manifest xmlns:android="http://schemas.android.com/apk/res/android"
package="org.foo.nfc.app"
android:versionCode="1"
android:versionName="1.0">
<uses-sdk
android:minSdkVersion="15"
android:targetSdkVersion="16" />

<uses-permission android:name="android.permission.NFC" />

<application
android:icon="@drawable/ic_launcher"
android:label="@string/app_name"
android:theme="@style/AppTheme">
<activity
android:name=".MainActivity"
android:label="@string/title_activity_main">
<intent-filter>
<action android:name="android.intent.action.MAIN" />
<category android:name="android.intent.category.LAUNCHER" />
</intent-filter>
</activity>

<uses-library
android:name="com.android.nfc_extras"
android:required="true" />
</application>
</manifest>

With the boilerplate out of the way it is finally time to actually access the SE API. Android doesn't currently implement a standard smart card communication API such as JSR 177 or the Open Mobile API, but instead offers a very basic communication interface in the NfcExecutionEnvironment (NFC-EE) class. It has only three public methods:

public class NfcExecutionEnvironment {
public void open() throws IOException {...}

public void close() throws IOException {...}

public byte[] transceive(byte[] in) throws IOException {...}
}

This simple interface is sufficient to communicate with the SE, so now we just need to get access to an instance. This is available via a static method of the NfcAdapterExtras class which controls both card emulation route (currently only to the SE, since UICC support is not available) and NFC-EE management. So the full code to send a command to the SE becomes:

NfcAdapterExtras adapterExtras = NfcAdapterExtras.get(NfcAdapter.getDefaultAdapter(context));
NfcExecutionEnvironment nfceEe = adapterExtras.getEmbeddedExecutionEnvironment();
nfcEe.open();
byte[] response = nfcEe.transceive(command);
nfcEe.close();

As we mentioned earlier however, com.android.nfc_extras is an optional package and thus not part of the SDK. We can't import it directly, so we have to either build our app as part of the full Android source (by placing it in /packages/apps/), or resort to reflection. Since the SE interface is quite small, we opt for ease of building and testing, and will use reflection. The code to get, open and use an NFC-EE instance now degenerates to something like this:

Class nfcExtrasClazz = Class.forName("com.android.nfc_extras.NfcAdapterExtras");
Method getMethod = nfcExtrasClazz .getMethod("get", Class.forName("android.nfc.NfcAdapter"));
NfcAdapter adapter = NfcAdapter.getDefaultAdapter(context);
Object nfcExtras = getMethod .invoke(nfcExtrasClazz, adapter);

Method getEEMethod = nfcExtras.getClass().getMethod("getEmbeddedExecutionEnvironment",
(Class[]) null);
Object ee = getEEMethod.invoke(nfcExtras , (Object[]) null);
Class eeClazz = se.getClass();
Method openMethod = eeClazz.getMethod("open", (Class[]) null);
Method transceiveMethod = ee.getClass().getMethod("transceive",
new Class[] { byte[].class });
Method closeMethod = eeClazz.getMethod("close", (Class[]) null);

openMethod.invoke(se, (Object[]) null);
Object response = transceiveMethod.invoke(se, command);
closeMethod.invoke(se, (Object[]) null);

We can of course wrap this up in a prettier package, and we will in the second part of the series. What is important to remember is to call close() when done, because wired access to the SE blocks contactless access while the NFC-EE is open. We should now have a working connection to the embedded SE and sending some bytes should produce a (error) response. Here's a first try:

D/SEConnection(27318): --> 00000000
D/SEConnection(27318): <-- 6E00


We'll explain what the response means and show how to send some actually meaningful commands in the second part of the article.

Summary

A secure element is a tamper resistant execution environment on a chip that can execute applications and store data in a secure manner. An SE is found on the UICC of every Android phone, but the platform currently doesn't allow access to it. Recent devices come with NFC support, which is often combined with an embedded secure element chip, usually in the same package. The embedded secure element can be accessed both externally via a NFC reader/writer (virtual mode) or internally via the NfcExecutionEnvironment API (wired mode). Access to the API is currently controlled by a system level whitelist of signing certificates and package names. Once an application is whitelisted, it can communicate with the SE without any other special permissions or restrictions.

Android secure element execution environment

$
0
0
In the previous post we gave a brief introduction of secure element (SE) support in mobile devices and showed how to communicate with the embedded SE in Android 4.x We'll now proceed to sending some actual command to the SE in order to find out more information about its OS and installed applications. Finally, we will discuss options for installing custom applets on the SE.

SE execution environments

The Android SE is essentially a smart card in a different package, so most standards and protocols originally developed for smart cards apply. Let's briefly review the relevant ones.

Smart cards have traditionally been file system-oriented and the main role of the OS was to handle file access and enforce access permissions. Newer cards support a VM running on top of the native OS that allows for the execution of 'platform independent' applications called applets, which make use of a well defined runtime library to implement their functionality. While different implementations of this paradigm exists, by far the most popular one is the Java Card runtime environment (JCRE). Applets are implemented in a restricted version of the Java language and use a subset of the runtime library, which offers basic classes for I/O, message parsing and cryptographic operations. While the JCRE specification fully defines the applet runtime environment, it does not specify how to load, initialize and delete applets on actual physical cards (tools are only provided for the JCRE emulator). Since one of the main applications of smart cards are various payment services, the application loading and initialization (often referred to as 'card personalization') process needs to be controlled and only authorized entities should be able to alter the card's and installed applications' state. A specification for securely managing applets was originally developed by Visa under the name Open Platform, and is now being maintained and developed by the GlobalPlatform (GP) organization under the name 'GlobalPlatform Card Specification' (GPCS). 

The Card Specification, as anything developed by a committee, is quite extensive and spans multiple documents. Those are quite abstract at times and make for a fun read, but the gist is that the card has a mandatory Card Manager component (also referred to as the 'Issuer Security Domain') that offers a well defined interface for card and individual application life cycle management. Executing Card Manager operations requires authentication using cryptographic keys saved on the card, and thus only an entity that knows those keys can change the state of the card (one of OP_READY, INITIALIZED, SECURED, CARD_LOCKED or TERMINATED) or manage applets. Additionally the GPCS defines secure communication protocols (called Secure Channel, SC) that besides authentication offer confidentiality and message integrity when communicating with the card.

SE communication protocols

As we showed in the previous post, Android's interface for communicating with the SE is the byte[] transceive(byte[] command) method of the NfcExecutionEnvironment class. The structure of the exchanged messages, called APDUs  (Application Protocol Data Unit) is defined in the ISO/IEC 7816-4: Organization, security and commands for interchange standard. The reader (also known as a Card Acceptance Device, CAD) sends command APDUs (sometimes referred to as C-APDUs) to the card, comprised of a mandatory 4-byte header with a command class (CLA), instruction (INS) and two parameters (P1 and P2). This is followed by the optional command data length (Lc), the actual data and finally the maximum number of response bytes expected, if any (Le). The card returns a response APDU (R-APDU) with a mandatory status word (SW1 and SW2) and optional response data. Historically, command APDU data has been limited to 255 bytes and response APDU data to 256 bytes. Recent cards and readers support extended APDUs with data length up to 65536 bytes, but those are not always usable, mostly for various compatibility reasons. The lower level  communication between the reader and the card is carried out by one of several transmission protocols, the most widely used ones being T=0 (byte-oriented) and T=1 (block-oriented). Both are defined in ISO 7816-3: Cards with contacts — Electrical interface and transmission protocols. The APDU exchange is not completely protocol-agnostic, because T=0 cannot directly send response data, but only notify the reader of the number of available bytes. Additional command APDUs (GET RESPONSE) need to be sent in order to retrieve the response data.

The original ISO 7816 standards were developed for contact cards, but the same APDU-based communication model is used for contactless cards as well. It is layered on top of the wireless transmission protocol defined by ISO/IEC 14443-4 which behaves much like T=1 for contact cards.

Exploring the Galaxy Nexus SE execution environment

With most of the theory out of the way, it is time to get our hands dirty and finally try to  communicate with the SE. As mentioned in the previous post, the SE in the Galaxy Nexus is a chip from NXP's SmartMX series. It runs a Java Card-compatible operating system and comes with a GlobalPlatform-compliant Card Manager. Additionally, it offers MIFARE Classic 4K emulation and a MIFARE4Mobile manager applet that allows for personalization of the emulated MIFARE tag. The MIFARE4Mobile specification is available for free, but comes with a non-disclosure, no-open-source, keep-it-shut agreement, so we will skip that and focus on the GlobalPlatform implementation. 

As we already pointed out, authentication is required for most of the Card Manager operations. The required keys are, naturally, not available and controlled by Google and their partners. Additionally, a number of subsequent failed authentication attempts (usually 10) will lock the Card Manager and make it impossible to install or remove applets, so trying out different keys is also not an option (and this is a good thing). However, the Card Manager does provide some information about itself and the runtime environment on the card in order to make it possible for clients to adjust their behaviour dynamically and be compatible with different cards. 

Since Java Card/GP is a multi-application environment, each application is identified by an AID (Application Identifier), consisting of a 5-byte RID (Registered Application Provider Identifier or Resource Identifier) and up to 11-byte PIX (Proprietary Identifier eXtension). Thus an AID can be from 5 to 16 bytes long. Before being able to send commands to particular applet it needs to be made active by issuing the SELECT (CLA='00', INS='A4') command with its AID. As all applications, the Card Manager is also identified by an AID, so our first step is to find this out. This can be achieved by issuing an empty SELECT which both selects the Card Manager and returns information about the card and the Issuer Security Domain. An empty select is simply a select without an AID specified, so the command becomes: 00 A4 04 00 00. Let's see what this produces:

--> 00A4040000
<-- 6F658408A000000003000000A5599F6501FF9F6E06479100783300734A06072A86488
6FC6B01600C060A2A864886FC6B02020101630906072A864886FC6B03640B06092A86488
6FC6B040215650B06092B8510864864020103660C060A2B060104012A026E0102 9000

A successful status (0x9000) and a long string of bytes. The format of this data is defined in Chapter 9. APDU Command Reference of the GPCS, and as most things in the smart card world is in TLV (Tag-Length-Value) format. In TLV each unit of data is described by a unique tag, followed by its length in bytes, and finally the actual data. Most structures are recursive, so the data can host another TLV structure, which in turns wraps another, and so on. Parsing this is not terribly hard, but it is not fun either, so we'll borrow some classes from the Java EMV Reader project to make our job a bit easier. You can see the full code in the sample project, but parsing the response produces something like this on a Galaxy Nexus:

SD FCI: Security Domain FCI
AID: AID: a0 00 00 00 03 00 00 00
RID: a0 00 00 00 03 (Visa International [US])
PIX: 00 00 00

Data field max length: 255
Application prod. life cycle data: 479100783300
Tag allocation authority (OID): globalPlatform 01
Card management type and version (OID): globalPlatform 02020101
Card identification scheme (OID): globalPlatform 03
Global Platform version: 2.1.1
Secure channel version: SC02 (options: 15)
Card config details: 06092B8510864864020103
Card/chip details: 060A2B060104012A026E0102


This shows as the AID of the Card Manager (A0 00 00 00 03 00 00 00), the version of the GP implementation (2.1.1) and the supported Secure Channel protocol (SC02, implementation option '15', which translates to: 'Initiation mode explicit, C-MAC on modified APDU, ICV set to zero, ICV encryption for CMAC session, 3 Secure Channel Keys') along with some proprietary data about the card configuration. Using the other GP command that don't require authentication, GET DATA, we can also get some information about the number and type of keys the Card Manager uses. The Key Information Template is marked by tag 'E0', so the command becomes 80 CA 00 E0 00. Executing it produces another TLV structure which when parsed spells this out:

Key: ID: 1, version: 1, type: DES (EBC/CBC), length: 128 bits
Key: ID: 2, version: 1, type: DES (EBC/CBC), length: 128 bits
Key: ID: 3, version: 1, type: DES (EBC/CBC), length: 128 bits
Key: ID: 1, version: 2, type: DES (EBC/CBC), length: 128 bits
Key: ID: 2, version: 2, type: DES (EBC/CBC), length: 128 bits
Key: ID: 3, version: 2, type: DES (EBC/CBC), length: 128 bits

This means that the Card Manager is configured with two versions of one key set, consisting of 3 double length DES keys (3DES where K3 = K1, aka DESede). The keys are used for authentication/encryption (S-ENC), data integrity (S-MAC) and data encryption (DEK), respectively. It is those keys we need to know in order to be able to install our own applets on the SE.

There is other information we can get from the Card Manager, such as the card issuer ID and the card image number, but it is of less interest. It is also possible to obtain information about the card manufacturer, card operating system version and release date by getting the Card Production Life Cycle Data (CPLC). This is done by issuing the GET DATA command with the '9F7F' tag: 80 CA 9F 7F 00. However, most of the CPLC data is encoded using proprietary tags and IDs so it is not very easy to read anything but the card serial number. Here's the output from a Galaxy Nexus:

CPLC
IC Fabricator: 4790
IC Type: 5044
Operating System Provider Identifier: 4791
Operating System Release Date: 0078
Operating System Release Level: 3300
IC Fabrication Date: 1017
IC Serial Number: 082445XX
IC Batch Identifier: 4645
IC ModuleFabricator: 0000
IC ModulePackaging Date: 0000
ICC Manufacturer: 0000
IC Embedding Date: 0000
Prepersonalizer Identifier: 1726
Prepersonalization Date: 3638
Prepersonalization Equipment: 32343435
Personalizer Identifier: 0000
Personalization Date: 0000
Personalization Equipment: 00000000

Getting an applet installed on the SE

No, this section doesn't tell you how to recover the Card Manager keys, so if that's what you are looking for, you can skip it. This is mostly speculation about different applet distribution models Google or carriers may (or may not) choose to use to allow third-party applets on their phones.

It should be clear by now that the only way to install an applet on the SE is to have access to the Card Manager keys. Since Google will obviously not give up the keys to production devices (unless they decide to scrap Google Wallet), there are two main alternatives for third parties that want to use the SE: 'development' devices with known keys, or some sort of an agreement with Google to have their applets approved and installed via Google's infrastructure. With Nexus-branded devices with an unlockable bootloader available on multiple carriers, as well directly from Google (at least in the US), it is unlikely that dedicated development devices will be sold again. That leaves delegated installation by Google or authorized partners. Let's see how this can be achieved.

The need to support multiple applications and load SE applets on mobile devices dynamically has been recognized by GlobalPlatform, and they have come up with, you guessed it, a standard that defines how this can be implemented. It is called Secure Element Remote Application Management and specifies an administration protocol for performing remote management of SE applets on a mobile device. Essentially, it involves securely downloading an applet and necessary provisioning scripts (created by a Service Provider) from an Admin Server, which are then forwarded by an Admin Agent running on the mobile device to the SE. The standard doesn't mandate a particular implementation, but in practice the process is carried out by downloading APDU scripts over HTTPS, which are then sent to the SE using one of the compatible GP secure channel protocols, such as SC02. As we shall see in the next article, a similar, though non-general and proprietary, scheme is already implemented in Google Wallet. If it were generalized to allow the installation of any (approved) applet, it could be used by applications that want to take advantage of the secure element: on first run they could check if the applet is installed, and if not, send a SE provisioning request to the Admin Server. It would then determine the proper Card Manager keys for the target device and prepare the necessary installation scripts. The role of the Admin Agent can be taken by the Google Play app which already has the necessary system permissions to install applications, and would only need to be extended to support SE access and Card Manager communication. As demonstrated by Google Wallet, this is already technologically possible. The difficulties for making it generally available are mostly contractual and/or political.

Since not all NFC-enabled phones with an embedded SE are produced or sold by Google, different vendors will control their respective Card Manager keys, and thus the Admin Server will need to know all of those in order to allow applet installation on all compatible devices. If UICCs are supported as a SE, this would be further complicated by the addition of new players: MNOs. Furthermore, service providers that deal with personal and/or financial information (pretty much all of the ones that matter do) require compliance with their own security standards, and that makes the job of the entity providing the Admin Server that much harder. The proposed solution to this is a neutral broker entity, called a Trusted Service Manager (TSM), that sets up both the required contractual agreements with all parties involved and takes care of securely distributing SE applications to supported mobile devices. The idea was originally introduced by the GSM Association a few years ago, and companies that offer TSM services exist today (most of those were already in the credit card provisioning business). RIM also provides a TSM service for their BlackBerries, but they have the benefit of being the manufacturer of all supported devices.

To sum this up: the only viable way of installing applets on the SE on commercial devices is by having them submitted to and delivered by a distribution service controlled by the device vendor or provided by a third-party TSM. Such a (general purpose) service is not yet available for Android, but is entirely technologically possible. If NFC payments and ticketing using Android do take off, more companies will want to jump on the bandwagon and contactless application distribution services will naturally follow, but this is sort of a chicken-and-egg problem. Even after they do become available, they will most likely deal only with major service providers such as credit card or transportation companies. Update: It seems Google's plan is to let third parties install their transport cards, loyalty cards, etc on the SE, but all under the Google Wallet umbrella, so a general purpose TSM might not be an option, at least for a while.

A more practical alternative for third-party developers is software card emulation. In this mode, the emulated card is not on a SE, but is actually implemented as a regular Android app. Once the NFC chip senses an external reader, it forwards communication to a registered app, which processes it and returns a response which the NFC chip simply relays. This obviously doesn't offer the same security as an SE, but comes with the advantage of not having to deal with MNOs, vendors or TSMs. This mode is not available in stock Android (and is unlikely to make it in the mainstream), but has been integrated into CyanogenMod and there are already commercial services that use it. For more info on the security implications of software card emulation, see this excellent paper.

Summary

We showed that the SE in recent Android phones offers a Java Card-compatible execution environment and implements GlobalPlatform specifications for card and applet management. Those require authentication using secret keys for all operations that change the card state. Because the keys for Android's SE are only available to Google and their partners, it is currently impossible for third parties to install applets on the SE, but that could change if general purpose TSM services targeting Android devices become available.

The final part of the series will look into the current Google Wallet implementation and explore how it makes use of the SE.

Exploring Google Wallet using the secure element interface

$
0
0
In the first post of this series we showed how to use the embedded secure element interface Android 4.x offers. Next, we used some GlobalPlatform commands to find out more about the SE execution environment in the Galaxy Nexus. We also showed that there is currently no way for third parties to install applets on the SE. Since installing our own applets is not an option, we will now find some pre-installed applets to explore. Currently the only generally available Android application that is known to install applets on the SE is Google's own Google Wallet. In this last post, we'll say a few words about how it works and then try to find out what publicly available information its applets host.

Google Wallet and the SE

To quote the Google Play description, 'Google Wallet holds your credit and debit cards, offers, and rewards cards'. How does it do this in practice though? The short answer: it's slightly complicated. The longer answer: only Google knows all the details, but we can observe a few things. After you install the Google Wallet app on your phone and select an account to use with it, it will contact the online Google Wallet service (previously known as Google Checkout), create or verify your account and then provision your phone. The provisioning process will, among other things, use First Data's Trusted Service Manager (TSM) infrastructure to download, install and personalize a bunch of applets on your phone. This is all done via the Card Manager and the payload of the commands is, of course, encrypted. However, the GP Secure Channel only encrypts the data part of APDUs, so it is fairly easy to map the install sequence on a device modified to log all SE communication. There are three types of applets installed: a Wallet controller applet, a MIFARE manager applet, and of course payment applets that enable your phone to interact with NFC-enabled PayPass terminals.

The controller applet securely stores Google Wallet state and event log data, but most importantly, it enables or disables contactless payment functionality when you unlock the Wallet app by entering your PIN. The latest version seems to have the ability to store and verify a PIN securely (inside the SE), however it does not appear it is actually used by the app yet, since the Wallet Cracker can still recover the PIN on a rooted phone. This implies that the PIN hash is still stored in the app's local database.

The MIFARE manager applet works in conjunction with the offers and reward/loyalty cards features of Wallet. When you save an offer or add a loyalty card, the MIFARE manager applet will write block(s) to the emulated MIFARE 4K Classic card to mirror the offer or card on the SE, letting you redeem it by tapping your phone at a NFC-enabled POS terminal. It also keeps an application directory (similar to the standard MIFARE MAD) in the last sectors, which is updated each time you add or remove a card. The emulated MIFARE card uses custom sector protection keys, which are most probably initialized during the initial provisioning process. Therefore you cannot currently read the contents of the MIFARE card with an external reader. However, the encryption and authentication scheme used by MIFARE Classic has been broken and proven insecure, and the keys can be recovered easily with readily available tools. It would be interesting to see if the emulated card is susceptible to the same attacks.

Finally, there should be one or more EMV-compatible payment applets that enable you to pay with your phone at compatible POS terminals. EMV is an interoperability standard for payments using chip cards, and while each credit card company has their proprietary extensions, the common specifications are publicly available. The EMV standard specifies how to find out what payment applications are installed on a contactless card, and we will use that information to explore Google Wallet further later.

Armed with that basic information we can now extend our program to check if Google Wallet applets are installed. Google Wallet has been around for a while, so by now the controller and MIFARE manager applets' AIDs are widely known. However, we don't need to look further than latest AOSP code, since the system NFC service has those hardcoded. This clearly shows that while SE access code is being gradually made more open, its main purpose for now is to support Google Wallet. The controller AID is A0000004762010 and the MIFARE manager AID is A0000004763030. As you can see, they start with the same prefix (A000000476), which we can assume is the Google RID (there doesn't appear to be a public RID registry). Next step is, of course, trying to select those. The MIFARE manager applet responds with a boring 0x9000 status which only shows that it's indeed there, but selecting the controller applet returns something more interesting:

6f 0f -- File Control Information (FCI) Template
84 07 -- Dedicated File (DF) Name
a0 00 00 04 76 20 10 (BINARY)
a5 04 -- File Control Information (FCI) Proprietary Template
80 02 -- Response Message Template Format 1
01 02 (BINARY)

The 'File Control Information' and 'Dedicated File' names are file system-based card legacy terms, but the DF (equivalent to a directory) is the AID of the controller applet (which we already know), and the last piece of data is something new. Two bytes looks very much like a short value, and if we convert this to decimal we get '258', which happens to be the controller applet version displayed in the 'About' screen of the current Wallet app ('v258').


Now that we have an app that can check for wallet applets (see sample code, screenshot above), we can verify if those are indeed managed by the Wallet app. It has a 'Reset Wallet' action on the Settings screen, which claims to delete 'payment information, card data and transaction history', but how does it affect the controller applets? Trying to select them after resetting Wallet shows that the controller applet has been removed, while the MIFARE manager applet is still selectable. We can assume that any payment applets have also been removed, but we still have no way to check. This leads us to the topic of our next section:

Exploring Google Wallet EMV applets

Google Wallet is compatible with PayPass terminals, and as such should follow relevant specifications. For contactless cards those are defined in the EMV Contactless Specifications for Payment Systems series of 'books'. Book A defines the overall architecture, Book B -- how to find and select a payment application, Book C -- the rules of the actual transaction processing for each 'kernel' (card company-specific processing rules), and Book D -- the underlying contactless communication protocol. We want to find out what payment applets are installed by Google Wallet, so we are most interested in Book B and the relevant parts of Book C.

Credit cards can host multiple payment applications, for example for domestic and international payment. Naturally, not all POS terminals know of or are compatible with all applications, so cards keep a public EMV app registry at a well known location. This practice is optional for contact cards, but is mandatory for contactless cards. The application is called 'Proximity Payment System Environment' (PPSE) and selecting it will be our first step. The application's AID is derived from the name: '2PAY.SYS.DDF01', which translates to '325041592E5359532E444446303131' in hex. Upon successful selection it returns a TLV data structure that contains the AIDs, labels and priority indicators of available applications (see Book B, 3.3.1 PPSE Data for Application Selection). To process it, we will use and slightly extend the Java EMV Reader library, which does similar processing for contact cards. The library uses the standard Java Smart Card I/O API to communicate with cards, but as we pointed out in the first article, this API is not available on Android. Card communication interfaces are nicely abstracted, so we only need to implement them using Android's native NfcExecutionEnvironment. The main classes we need are SETerminal, which creates a connection to the card, SEConnection to handle the actual APDU exchange, and SECardResponse to parse the card response into status word and data bytes. As an added bonus, this takes care of encapsulating our uglish reflected code. We also create a PPSE class to parse the PPSE selection response into its components. With all those in place all we need to do is follow the EMV specification. Selecting the PPSE with the following command works at first try, but produces a response with 0 applications:

--> 00A404000E325041592E5359532E4444463031
<-- 6F10840E325041592E5359532E4444463031 9000
response hex :
6f 10 84 0e 32 50 41 59 2e 53 59 53 2e 44 44 46
30 31
response SW1SW2 : 90 00 (Success)
response ascii : o...2PAY.SYS.DDF01
response parsed :
6f 10 -- File Control Information (FCI) Template
84 0e -- Dedicated File (DF) Name
32 50 41 59 2e 53 59 53 2e 44 44 46 30 31 (BINARY)

We have initialized the $10 prepaid card available when first installing Wallet, so something must be there. We know that the controller applet manages payment state, so after starting up and unlocking Wallet we finally get more interesting results (shown parsed and with some bits masked below). It turns out that locking the Wallet up effectively hides payment applications by deleting them from the PPSE. This, in addition to the fact that card emulation is available only when the phone's screen is on, provides better card security than physical contactless cards, some of which can easily be read by simply using a NFC-equipped mobile phone, as has been demonstrated.

Applications (2 found):
Application
AID: a0 00 00 00 04 10 10 AA XX XX XX XX XX XX XX XX
RID: a0 00 00 00 04 (Mastercard International [US])
PIX: 10 10 AA XX XX XX XX XX XX XX XX
Application Priority Indicator
Application may be selected without confirmation of cardholder
Selection Priority: 1 (1 is highest)
Application
AID: a0 00 00 00 04 10 10
RID: a0 00 00 00 04 (Mastercard International [US])
PIX: 10 10
Application Priority Indicator
Application may be selected without confirmation of cardholder
Selection Priority: 2 (1 is highest)

One of the applications is the well known MasterCard credit or debit application, and there is another MasterCard app with a longer AID and higher priority (1, the highest). The recently announced update to Google Wallet allows you to link practically any card to your Wallet account, but transactions are processed by a single 'virtual' MasterCard and then billed back to your actual credit card(s). It is our guess that the first application in the list above represents this virtual card. The next step in the EMV transaction flow is selecting the preferred payment app, but here we hit a snag: selecting each of the apps always fails with the 0x6999 ('Applet selection failed') status. It has been reported that this was possible in previous versions of Google Wallet, but has been blocked to prevent relay attacks and stop Android apps from extracting credit card information from the SE. This leaves us with using the NFC interface if we want to find out more.

Most open-source tools for card analysis, such as cardpeek and Java EMV Reader were initially developed for contact cards, and therefore need a connection to a PC/SC-compliant reader to operate. If you have a dual interface reader that provides PC/SC drivers you get this for free, but for a standalone NFC reader we need libnfc, ifdnfc and PCSC lite to complete the PC/SC stack on Linux. Getting those to play nicely together can be a bit tricky, but once it's done card tools work seamlessly. Fortunately, selection via the NFC interface is successful and we can proceed with the next steps in the EMV flow: initiating processing by sending the GET PROCESSING OPTIONS and reading relevant application data using the READ RECORD command. For compatibility reasons, EMV payment applications contain data equivalent to that found on the magnetic stripe of physical cards. This includes account number (PAN), expiry date, service code and card holder name. EMV-compatible POS terminals are required to support transactions based on this data only ('Mag-stripe mode'), so some of it could be available on Google Wallet as well. Executing the needed READ RECORD commands shows that it is indeed found on the SE, and both MasterCard applications are linked to the same mag-stripe data. The data is as usual in TLV format, and relevant tags and format are defined in EMV Book C-2. When parsed it looks like this for the Google prepaid card (slightly masked):

Track 2 Equivalent Data:
Primary Account Number (PAN) - 5430320XXXXXXXX0
Major Industry Identifier = 5 (Banking and financial)
Issuer Identifier Number: 543032 (Mastercard, UNITED STATES OF AMERICA)
Account Number: XXXXXXXX
Check Digit: 0 (Valid)
Expiration Date: Sun Apr 30 00:00:00 GMT+09:00 2017
Service Code - 101:
1 : Interchange Rule - International interchange OK
0 : Authorisation Processing - Normal
1 : Range of Services - No restrictions
Discretionary Data: 0060000000000

As you can see, it does not include the card holder name, but all the other information is available, as per the EMV standard. We even get the 'transaction in progress' animation on screen while our reader is communicating with Google Wallet. We can also get the PIN try counter (set to 0, in this case meaning disabled), and a transaction log in the format shown below. We can't verify if the transaction log is used though, since Google Wallet, like a lot of the newer Google services, happens to be limited to the US .

Transaction Log:
Log Format:
Cryptogram Information Data (1 byte)
Amount, Authorised (Numeric) (6 bytes)
Transaction Currency Code (2 bytes)
Transaction Date (3 bytes)
Application Transaction Counter (ATC) (2 bytes)

This was fun, but it doesn't really show much besides the fact that Google Wallet's virtual card(s) comply with the EMV specifications. What is more interesting is that the controller applet APDU commands that toggle contactless payment and modify the PPSE don't require additional application authentication and can be issued by any app that is whitelisted to use the secure element. The controller applet most probably doesn't store any really sensitive information, but while it allows its state to be modified by third party applications, we are unlikely to see any other app besides Google Wallet whitelsited on production devices. Unless of course more fine-grained SE access control is implemented in Android.

Fine-grained SE access control

This fact that Google Wallet state can be modified by third party apps (granted access to the SE, of course) leads us to another major complication with SE access on mobile devices. While the data on the SE is securely stored and access is controlled by the applets that host it, once an app is allowed access, it can easily perform a denial of service attack against the SE or specific SE applications. Attacks can range from locking the whole SE by repeatedly executing failed authentication attempts until the Card Manager is blocked (a GP-compliant card goes into the TERMINATED state usually after 10 unsuccessful tries), to application-specific attacks such as blocking a cardholder verification PIN or otherwise changing a third party applet state. Another more sophisticated, but harder to achieve and possible only on connected devices, attack is a relay attack. In this attack, the phone's Internet connection is used to receive and execute commands sent by another remote phone, enabling the remote device to emulate the SE of the target device without physical proximity. The way to mitigate those attacks is to exercise finer control on what apps that access the SE can do by mandating that they can only select specific applets or only send a pre-approved list of APDUs. This is supported by JSR-177 Security and Trust Servcies API which only allows connection to one specific applet and only grants those to applications with trusted signature (currently implemented in BlackBerry 7 API). JSR-177 also  provides the ability to restrict APDUs by matching them against an APDU mask to determine whether they should be allowed or not. SEEK for Android goes on step further than BlackBerry by supporting fine-grained access control with access policy stored on the SE. The actual format of ACL rules and protocols for managing them are defined in GlobalPlatform Secure Element Access Control standard, which is relatively new (v.1.0 released on May 2012). As we have seen, the current (4.0 and 4.1) stock Android versions do restrict access to the SE to trusted applications by whitlisting their certificates (a hash of those would have probably sufficed) in /etc/nfcee_access.xml, but once an app is granted access it can select any applet and send any APDU to the SE. If third party apps that use the SE are to be allowed in Android, more fine-grained control needs to be implemented by at least limiting the applets SE-whitelisted Android apps can select.

Because for most applications the SE is used in conjunction with NFC, and SE app needs to be notified of relevant NFC events such as RF field detection or applet selection via the NFC interface. Disclosure of such events to malicious applications can also potentially lead to denial of service attacks, that is why access to them needs to be controlled as well. The GP SE access control specification allows rules for controlling access to NFC events to be managed along with applet access rules by saving them on the SE. In Android, global events are implemented by using  broadcasts and interested applications can create and register a broadcast receiver component that will receive such broadcasts. Broadcast access can be controlled with standard Android signature-based permissions, but that has the disadvantage that only apps signed with the system certificate would be able to receive NFC events, effectively limiting SE apps to those created by the device manufacturer or MNO. Android 4.x therefore uses the same mechanism employed to control SE access -- whitelisting application certificates. Any application registered in nfcee_access.xml can receive the broadcasts listed below. As you can see, besides RF field detection and applet selection, Android offers notifications for higher-level events such as EMV card removal or MIFARE sector access. By adding a broadcast receiver to our test application as shown below, we were able to receive AID_SELECTED and RF field-related broadcasts. AID_SELECTED carries an extra with the AID of the selected applet, which allows us to start a related activity when an applet we support is selected. APDU_RECEIVED is also interesting because it carriers an extra with the received APDU, but that doesn't seem to be sent, at least not in our tests.

<receiver android:name="org.myapp.nfc.SEReceiver">
<intent-filter>
<action android:name="com.android.nfc_extras.action.AID_SELECTED" />
<action android:name="com.android.nfc_extras.action.APDU_RECEIVED" />
<action android:name="com.android.nfc_extras.action.MIFARE_ACCESS_DETECTED" />
<action android:name="android.intent.action.MASTER_CLEAR_NOTIFICATION" />
<action android:name="com.android.nfc_extras.action.RF_FIELD_ON_DETECTED" />
<action android:name="com.android.nfc_extras.action.RF_FIELD_OFF_DETECTED" />
<action android:name="com.android.nfc_extras.action.EMV_CARD_REMOVAL" />
<action android:name="com.android.nfc.action.INTERNAL_TARGET_DESELECTED" />
</intent-filter>
</receiver>

Summary

We showed that Google Wallet installs a few applets on the SE when first initialized. Besides the expected EMV payment applets, if makes use of a controller applet for securely storing Wallet state and a MIFARE manager applet for reading/writing emulated card sectors from the app. While we can get some information about the EMV environment by sending commands to the SE from an app, payment applets cannot be selected via the wired SE interface, but only via the contactless NFC interface. Controller applet access is however available to third party apps, as long as they know the relevant APDU commands, which can easily be traced by logging. This might be one of the reasons why third party SE apps are not supported on Android yet. To make third party SE apps possible (besides offering a TSM solution),  Android needs to implement more-fined grained access control to the SE, for example by restricting what applets can be selected or limiting the range of allowed APDUs for whitelisted apps.

Emulating a PKI smart card with CyanogenMod 9.1

$
0
0
We discussed the embedded secure element available in recent Android devices, it's execution environment and how Google Wallet makes use if it in the last series of articles. We also saw that unless you have a contract with Google and have them (or the TSM they use) distribute your applets to supported devices, there is currently no way to install anything on the embedded secure element. We briefly mentioned that CyanogenMod 9.1 supports software card emulation and it is a more practical way to create your own NFC-enabled applications. We'll now see how software card emulation works and show how you can use it to create a simple PKI 'applet' that can be accessed via NFC from any machine with a contactless card reader.

Software card emulation

We already know that if the embedded secure element is put in virtual mode it is visible to external readers as a contactless smartcard. Software card emulation (sometimes referred to as Host Card Emulation or HCE) does something very similar, but instead of routing commands received by the NFC controller to the SE, it delivers them to the application processor, and they can be processed by regular applications. Responses are then sent via NFC to the reader, and thus your app takes the role of a virtual contactless 'smartcard' (refer to this paper for a more thorough discussion).  Software card emulation is currently available on BlackBerry phones, which offer standard APIs for apps to register with the OS and process card commands received over NFC. Besides a BlackBerry device, you can use some contactless  readers in emulation mode to emulate NFC tags or a full-featured smart card. Stock Android doesn't (yet) support software card emulation, even though the NFC controllers in most current phones have this capability. Fortunately, recent version of CyanogenMod integrate a set of patches that unlock this functionality of the PN544 NFC controller found in recent Nexus (and other) devices. Let's see how it works in a bit more detail.

CyanogenMod implementation

Android doesn't provide a direct interface to its NFC subsystem to user-level apps. Instead, it leverages the OS's intent and intent filter infrastructure to let apps register for a particular NFC event (ACTION_NDEF_DISCOVERED, ACTION_TAG_DISCOVERED and ACTION_TECH_DISCOVERED) and specify additional filters based on tag type or features. When a matching NFC tag is found, interested applications are notified and one of them is selected to handle the event, either by the user or automatically if it is in the foreground and has registered for foreground dispatch. The app can then access a generic Tag object representing the target NFC device and use it to retrieve a concrete tag technology interface such as MifareClassic or IsoDep that lets it communicate with the device and use its native features. Card emulation support in CyanogenMod doesn't attempt to change or amend Android's NFC architecture, but integrates with it by adding support for two new tag technologies: IsoPcdA and IsoPcdB. 'ISO' here is the International Organization for Standardization, which among other things, is responsible for defining NFC communication standards. 'PCD' stands for Proximity Coupling Device, which is simply ISO-speak for a contactless reader. The two classes cover the two main NFC flavours in use today (outside of Japan, at least) -- Type A (based on NXP technology) and Type B (based on Motorolla technology). As you might have guessed by now, the patch reverses the usual roles in the Android NFC API: the external contactless reader is presented as a 'tag', and 'commands' you send from the phone are actually replies to the reader-initiated communication. If you have Google Wallet installed the embedded secure element is activated as well, so touching the phone to a reader would produce a potential conflict: should it route commands to the embedded SE or to applications than can handle IsoPcdA/B tags? The CyanogenMod patch handles this by using Android's native foreground dispatch mechanism: software card emulation is only enabled for apps that register for foreground dispatch of the relevant tag technologies. So unless you have an emulation app in the foreground, all communication would be routed to Google Wallet (i.e., the embedded SE). In practice though, starting up Google Wallet on ROMs with the current version of the patch might block software card emulation, so it works best if Google Wallet is not installed. A fix is available, but not yet merged in CyanogenMod master (Updated: now merged, should roll out with CM10 nightlies) .

Both of the newly introduced tag technologies extend BasicTagTechnology and offer methods to open, check and close the connection to the reader. They add a public transceive() method that acts as the main communication interface: it receives reader commands and sends the responses generated by your app to the PCD. Here's a summary of the interface:

abstract class BasicTagTechnology implements TagTechnology {
public boolean isConnected() {...}

public void connect() throws IOException {...}

public void reconnect() throws IOException {...}

public void close() throws IOException {...}

byte[] transceive(byte[] data, boolean raw) throws IOException {...}
}

Now that we know (basically) how it works, let's try to use software card emulation in practice.

Emulating a contactless card

As discussed in the previous section, to be able to respond to reader commands we need to register our app for one of the PCD tag technologies and enable foreground dispatch. This is no different than handling stock-supported  NFC technologies. We need to add an intent filter and a reference to a technology filter file to the app's manifest:

<activity android:label="@string/app_name"
android:launchmode="singleTop"
android:name=".MainActivity"
<intent-filter>
<action android:name="android.nfc.action.TECH_DISCOVERED" />
</intent-filter>

<meta-data android:name="android.nfc.action.TECH_DISCOVERED"
android:resource="@xml/filter_nfc" />
</activity>

We register the IsoPcdA tag technology in filter_nfc.xml:

<resources>
<tech-list>
<tech>android.nfc.tech.IsoPcdA</tech>
</tech-list>
</resources>

And then use the same technology list to register for foreground dispatch in our activity:

public class MainActivity extends Activity {

public void onCreate(Bundle savedInstanceState) {
pendingIntent = PendingIntent.getActivity(this, 0, new Intent(this,
getClass()).addFlags(Intent.FLAG_ACTIVITY_SINGLE_TOP), 0);
filters = new IntentFilter[] { new IntentFilter(
NfcAdapter.ACTION_TECH_DISCOVERED) };
techLists = new String[][] { { "android.nfc.tech.IsoPcdA" } };
}

public void onResume() {
super.onResume();
if (adapter != null) {
adapter.enableForegroundDispatch(this, pendingIntent, filters,
techLists);
}
}

public void onPause() {
super.onPause();
if (adapter != null) {
adapter.disableForegroundDispatch(this);
}
}

}

With this in place, each time the phone is touched to an active reader, we will get notified via the activity's onNewIntent() method. We can get a reference to the Tag object using the intent's extras as usual. However, since neither IsoPcdA nor its superclass are part of the public SDK, we need to either build the app as part of CyanogenMod's source, or, as usual, resort to reflection. We choose to create a simple wrapper class that calls IsoPcdA methods via reflection, after getting an instance using the static get() method like this:

Class cls = Class.forName("android.nfc.tech.IsoPcdA");
Method get = cls.getMethod("get", Tag.class);
// this returns an IsoPcdA instance
tagTech = get.invoke(null, tag);

Now after we connect() we can use the transceive() method to reply to reader commands. Note that since the API is not event-driven, you won't get notified with the reader command automatically. You need to send a dummy payload to retrieve the first reader command APDU. This can be a bit awkward at first, but you just have to keep in mind that each time you call transceive() the next reader command comes in via the return value. Unfortunately this means that after you send your last response, the thread will block on I/O waiting for transceive() to return, which only happens after the reader sends its next command, which might be never. The thread will only stop if an exception is thrown, such as when communication is lost after separating the phone from the reader. Needless to say, this makes writing robust code a bit tricky. Here's how to start off the communication:

// send dummy data to get first command APDU
// at least two bytes to keep smartcardio happy
byte[] cmd = transceive(new byte[] { (byte) 0x90, 0x00 });

Writing a virtual PKI applet

Software card emulation in CyanogneMod is limited to ISO 14443-4 (used mostly for APDU-based communication), which means that you cannot emulate cards that operate on a lower-level protocol such as MIFARE Classic. This leaves out opening door locks that rely on the card UID with your phone (the UID of the emulated card is random) or getting a free ride on the subway (you cannot clone a traffic card with software alone), but allows for emulating payment (EMV) cards which use an APDU-based protocol. In fact, the first commercial application (company started by patch author Doug Yeagerthat makes use of Android software card emulation, Tapp, emulates a contactless Visa card and does all necessary processing 'in the cloud', i.e., on a remote server. Payment applications are the ones most likely to be developed using software card emulation because of the potentially higher revenue: at least one other company has announced that it is building a cloud-based NFC secure element. We, however, will look at a different use case: PKI.

PKI has been getting a lot of bad rep due to major CAs getting compromised every other month, and it has been stated multiple times that it doesn't really work on the Internet. It is however still a valid means of authentication in a corporate environment where personal certificates are used for anything from desktop login to remote VPN access. Certificates and associated private keys are often distributed on smart cards, sometimes contactless or dual-interface. Since Android now has standard credential storage which can be protected by hardware on supported devices, we could use an Android phone with software card emulation in place of a PKI card. Let's try to write a simple PKI 'applet' and an associated host-side client application to see if this is indeed feasible.

A PKI JavaCard applet can offers various features, but the essential ones are:
  • generating or importing keys
  • importing a public key certificate
  • user authentication (PIN verification)
  • signing and/or encryption with card keys
Since we will be using Android's credential storage to save keys and certificates, we already have the first two features covered. All we need to implement is PIN verification and signing (which is actually sufficient for most applications, including desktop login and SSL client authentication). If we were building a real solution, we would implement a well known applet protocol, such as one of a major vendor or an open one, such as the MUSCLE card protocol, so that we can take advantage of desktop tools and cryptographic libraries (Windows CSPs and PKCS#11 modules, such as OpenSC). But since this is a proof-of-concept exercise, we can get away by defining our own mini-protocol and only implement the bare minimum. We define the applet AID (quite arbitrary, and may be in already in use by someone else, but there is really no way to check) and two commands: VERIFY PIN and SIGN DATA. The protocol is summarized in the table below:

Virtual PKI applet protocol
CommandCLAINSP1P2LcDataResponse
SELECT00A4040006AID: A00000000101109000/6985/6A82/6F00
VERIFY PIN8001XXXXPIN length (bytes)PIN characters (ASCII)9000/6982/6985/6F00
SIGN DATA8002XXXXSigned data length (bytes)Signed data9000+signature bytes/6982/6985/6F00

The applet behaviour is rather simple: it returns a generic error if you try to send any commands before selecting it, and then requires you to authenticate by verifying the PIN before signing data. To implement the applet, we first handle new connections from a reader in the main activity's onNewIntent() method, where we receive an Intent containing a reference to the IsoPcdA object we use to communicate with the PCD. We verify that the request comes from a card reader, create a wrapper for the Tag object, connect() to the reader and finally pass control to the PkiApplet by calling it's start() method.

Tag tag = (Tag) intent.getExtras().get(NfcAdapter.EXTRA_TAG);
List techList = Arrays.asList(tag.getTechList());
if (!techList.contains("android.nfc.tech.IsoPcdA")) {
return;
}

TagWrapper tw = new TagWrapper(tag, "android.nfc.tech.IsoPcdA");
if (!tw.isConnected()) {
tw.connect();
}

pkiApplet.start(tw);

The applet in turn starts a background thread that reads commands until available and exits if communication with the reader is lost. The implementation is not terribly robust, but is works well enough for our POC:

Runnable r = new Runnable() {
public void run() {
try {
// send dummy data to get first command APDU
byte[] cmd = transceive(new byte[] { (byte) 0x90, 0x00 });
do {
// process commands
} while (cmd != null && !Thread.interrupted());
} catch (IOException e) {
// connection with reader lost
return;
}
}
};

appletThread = new Thread(r);
appletThread.start();


Before the applet can be used it needs to be 'personalized'. In our case this means importing the private key the applet will use for signing and setting a PIN. To initialize the private key we import a PKCS#12 file using the KeyChain API and store the private key alias in shared preferences. The PIN is protected using 5000 iterations of PBKDF2 with a 64-bit salt. We store the resulting PIN hash and the salt in shared preferences as well and repeat the calculation against the PIN we receive from applet clients to check if it matches. This avoids storing the PIN in clear text, but keep in mind that a short numeric-only PIN can be brute-forced in minutes (the app doesn't restrict PIN size, it can be up to 255 characters (bytes), the maximum size of APDU data). Here's how our 'personalization' UI looks like:


To make things simple, applet clients send the PIN in clear text, so it could theoretically be sniffed if NFC traffic is intercepted. This can be avoided by using some sort of a challenge-response mechanism, similar to what 'real' (e.g., EMV) cards do. Once the PIN is verified, clients can send the data to be signed and receive the signature bytes in the response. Since the size of APDU data is limited to 255 bytes (due to the single byte length field) and the applet doesn't support any sort of chaining, we are limited to using RSA keys up to 1024 bits long (a 2048-bit key needs 256 bytes). The actual applet implementation is quite straightforward: it does some minimal checks on received APDU commands, gets the PIN or signed data and uses it to execute the corresponding operation. It then selects a status code based on operation success or failure and returns it along with the result data in the response APDU. See the source code for details.

Writing a host-side applet client

Now that we have an applet, we need a host-side client to actually make use of it. As we mentioned above, for a real-world implementation this would be a standard PKCS#11 or CSP module for the host operating system that plugs into PKI-enabled applications such as browsers or email and VPN clients. We'll however create our own test Java client using the Smart Card I/O API (JSR 268). This API comes with Sun/Oracle Java SDKs since version 1.6 (Java 6), but is not officially a part of the SDK, because it is apparently not 'of sufficiently wide interest' according to the JSR expert group (committee BS at its best!). Eclipse goes as far as to flag it as a 'forbidden reference API', so you'll need to change error handling preferences to compile in Eclipse. In practice though, JSR 268 is a standard API that works fine on Windows, Solaris, Linux an Mac OS X (you may have to set the sun.security.smartcardio.library system property to point to your system's PC/SC library), so we'll use it for our POC application. The API comes with classes representing card readers, the communication channel and command and response APDUs. After we get a reference to a reader and then a card, we can create a channel and exchange APDUs with the card. Our PKI applet client is a basic command line program that waits for card availability and then simply sends the SELECT, VERIFY PIN and SIGN DATA commands in sequence, bailing out on any error (card response with status different from 0x9000). The PIN is specified in the first command line parameter and if you pass a certificate file path as the second one, it will use it to verify the signature it gets from the applet. See full code for details, but here's how to connect to a card and send a command:

TerminalFactory factory = TerminalFactory.getDefault();
CardTerminals terminals = factory.terminals();

Card card = waitForCard(terminals);
CardChannel channel = card.getBasicChannel();
CommandAPDU cmd = new CommandAPDU(CMD);
ResponseAPDU response = channel.transmit(cmd);

Card waitForCard(CardTerminals terminals)
throws CardException {
while (true) {
for (CardTerminal ct : terminals
.list(CardTerminals.State.CARD_INSERTION)) {
return ct.connect("*");
}
terminals.waitForChange();
}
}

And to prove that this all works, here's the output from a test run of the client application:

$ ./run.sh 1234 mycert.crt 
Place phone/card on reader to start
--> 00A4040006A0000000010101
<-- 9000
--> 800100000431323334
<-- 9000
--> 80020000087369676E206D6521
<-- 11C44A5448... 9000 (128)

Got signature from card: 11C44A5448...
Will use certificate from 'mycert.crt' to verify signature
Issuer: CN=test-CA, ST=Tokyo, C=JP
Subject: CN=test, ST=Tokyo, C=JP
Not Before: Wed Nov 30 00:04:31 JST 2011
Not After: Thu Nov 29 00:04:31 JST 2012

Signature is valid: true

This software implementation comes, of course, with the disadvantage that while the actual private key might be protected by Android's system key store, PIN verification and other operations not directly protected by the OS will be executed in a regular app. An Android app, unlike a dedicated smart card, could be compromised by other (malicious) apps with sufficient privileges. However, since recent Android devices do have (some) support for a Trusted Execution Environment (TEE), the sensitive parts of our virtual applet can be implemented as Trusted Application (TA) running within the TEE. The user-level app would then communicate with the TA using the controlled TEE interface, and the security level of the system could come very close to running an actual applet in a dedicated SE.

Summary

Android already supports NFC card emulation using an embedded SE (stock Android) or the UICC (various vendor firmwares). However, both of those are tightly controlled by their owning entities (Google or MNOs), and there is currently no way for third party developers to install applets and create card emulation apps. An alternative to SE-based card emulation is software card emulation, where an user-level app processes reader commands and returns responses via the NFC controller. This is supported by commonly deployed NFC controller chips, but is not implemented in the stock Andorid NFC subsystem. Recent versions of CyanogneMod however do enable it by adding support for two more tag technologies (IsoPcdA and IsoPcdB) that represent contactless readers instead of actual tags. This allows Android applications to emulate pretty much any ISO 14443-4 compliant contactless card application: from EMV payment applications to any custom JavaCard applet. We presented a sample app that emulates a PKI card, allowing you to store PKI credentials on your phone and potentially use it for desktop login or VPN access on any machine equipped with a contacltess reader. Hopefully software card emulation will become a part of stock Android in the future, making this and other card emulation NFC applications mainstream.

Android online account management

$
0
0
Our recent posts covered NFC and the secureelement as supported in recent Android versions, including community ones. In this two-part series we will take a completely different direction: managing online user accounts and accessing Web services. We will briefly discuss how Android manages user credentials and then show how to use cached authentication details to log in to most Google sites without requiring additional user input. Most of the functionality we shall discuss is hardly new -- it has been available at least since Android 2.0. But while there is ample documentation on how to use it, there doesn't see to be a 'bigger picture' overview of how the pieces are tied together. This somewhat detailed investigation was prompted by trying to develop an app for a widely used Google service that unfortunately doesn't have an official API and struggling to find a way to login to it using cached Google credentials. More on this in the second part, let's first see how Android manages accounts for online services.

Android account management

Android 2.0 (API Level 5, largely non-existent, because it was quickly succeeded by 2.0.1, Level 6), introduced the concept of centralized account management with a public API. The central piece in the API is the AccountManager class which, quote: 'provides access to a centralized registry of the user's online accounts. The user enters credentials (user name and password) once per account, granting applications access to online resources with "one-click" approval.' You should definitely read the full documentation of the class, which is quite extensive, for more details. Another major feature of the class is that it lets you get an authentication token for supported accounts, allowing third party applications to authenticate to online services without needing to handle the actual user password (more on this later). It also has a whole of 5 methods that allow you to get an authentication token, all but one with at least 4 parameters, so finding the one you need might take some time, with yet some more to get the parameters right. It might be a good idea to start with the synchronous blockingGetAuthToken() and work your way from there once you have a basic working flow. On some older Android versions, the AccountManager would also monitor your SIM card and wipe cached credentials if you swapped cards, but fortunately this 'feature' has been removed in Android 2.3.4.

The AccountManager, as most Android system API's, is just a facade for the AccountManagerService which does the actual work. The service doesn't provide an implementation for any particular form of authentication though. It only acts as a coordinator for a number of pluggable authenticator modules for different account types (Google, Twitter, Exchange, etc.). The best part is that any application can register an authentication module by implementing an account authenticator and related classes, if needed. Android Training has a tutorial on the subject that covers the implementation details, so we will not discuss them here. Registering a new account type with the system lets you take advantage of a number of Android infrastructure services:
  • centralized credential storage in a system database
  • ability to issue tokens to third party apps
  • ability to take advantage of Android's automatic background synchronization
One thing to note is that while credentials (usually user names and passwords) are stored in a central database (/data/system/accounts.db or /data/system/user/0/accounts.db on Jelly Bean and later for the first system user), that is only accessible to system applications, credentials are in no way encrypted -- that is left to the authentication module to implement as necessary. If you have a rooted device (or use the emulator) listing the contents of the accounts table might be quite instructive: some of your passwords, especially for the stock Email application, will show up in clear text. While the AccountManger has a getPassword() method, it can only be used by apps with the same UID as the account's authenticator, i.e., only by classes in the same app (unless you are using sharedUserId, which is not recommended for non-system apps). If you want to allow third party applications to authenticate using your custom accounts, you have to issue some sort of authentication token, accessible via one of the many getAuthToken() methods. Once your account is registered with Android, if you implement an additional sync adapter, you can register to have it called at a specified interval and do background syncing for you app (one- or two-way), without needing to manage scheduling yourself. This is a very powerful feature that you get practically for free, and probably merits its own post. As we now have a basic understanding of authentication modules, let's see how they are used by the system.

As we mentioned above, account management is coordinated by the AccountManagerService. It is a fairly complex piece of code (about 2500 lines in JB), most of the complexity stemming from the fact that it needs to communicate with services and apps that span multiple processes and threads within each process, and needs to take care of synchronization and delivering results to the right thread. If we abstract out the boilerplate code, what it does on a higher level is actually fairly straightforward:
  • on startup it queries the PackageManager to find out all registered authenticators, and stores references to them in a map, keyed by account type
  • when you add an account of a particular type, it saves its type, username and password to the accounts table
  • if you get, set or reset the password for an account, it accesses or updates the accounts table accordingly
  • if you get or set user data for the account, it is fetched from or saves to the extras table
  • when you request a token for a particular account, things become a bit more interesting:
    • if a token with the specified type has never been issued before, it shows a confirmation activity asking (see screenshot below) the user to approve access for the requesting application. If they accept, the UID of the requesting app and the token type are saved to the grants table.
    • if a grant already exits, it checks the authtoken table for tokens matching the request. If a valid one exists, it is returned.
    • if a matching token is not found, it finds the authenticator for the specified account type in the map and calls its getAuthToken() method to request a token. This usually involves the authenticator fetching the username and password from the accounts table (via the getPassword() method) and calling its respective online service to get a fresh token. When one is returned, it gets cached in the authtokens table and then returned to the requesting app (usually asynchronously via a callback).
  • if you invalidate a token, it gets deleted from the authtokens table

Now that we know how Android's account management system works, let's see how it is implemented for the most widely used account type.

Google account management

    Usually the first thing you do when you turn on your brand new (or freshly wiped) 'Google Experience' Android device is to add a Google account. Once you authenticate successfully, you are offered to sync data from associated online services (GMail, Calendar, Docs, etc.) to your device. What happens behinds the scenes is that an account of type 'com.google' is added via the AccountManager, and a bunch of Google apps start getting tokens for the services they represent. Of course, all of this works with the help of an authentication provider for Google accounts. Since it plugs in the standard account management framework, it works by registering an authenticator implementation and using it involves the sequence outlined above. However, it is also a little bit special. Three main things make it different:
    • it is not part of any particular app you can install, but is bundled with the system
    • a lot of the actual functionality is implemented on the server side
    • it does not store passwords in plain text on the device
    If you have ever installed a community ROM built off AOSP code, you know that in order to get GMail and other Google apps to work on your device, you need a few bits not found in AOSP. Two of the required pieces are the Google Services Framework (GSF) and the Google Login Service (GLS). The former provides common services to all Google apps such as centralized settings and feature toggle management, while the latter implements the authentication provider for Google accounts and will be the topic of this section.

    Google provides a multitude of online services (not all of which survive for long), and consequently a bunch of different methods to authenticate to those. Android's Google Login Service, however doesn't call those public authentication API's directly, but via a dedicated online service, which lives at android.clients.google.com. It has endpoints both for authentication and authorization token issuing, as well as data feed (mail, calendar, etc.) synchronization, and more. As we shall see, the supported methods of authentication are somewhat different from those available via other public Google authentication API's. Additionally, it supports a few 'special' token types that greatly simplify some complex authentication flows.

    All of the above is hardly surprising: when you are dealing with online services it is only natural to have as much as possible of the authentication logic on the server side, both for ease of maintenance and to keep it secure. Still, to kick start it you need to store some sort of credentials on the device, especially when you support background syncing for practically everything and you cannot expect people to enter them manually. On-device credential management is one of the services GLS provides, so let's see how it is implemented. As mentioned above, GLS plugs into the system account framework, so cached credentials, tokens and associated extra data are stored in the system's accounts.db database, just as for other account types. Inspecting it reveals that Google accounts have a bunch of Base64-encoded strings associated with them. One of the user data entries (in the extras table) is helpfully labeled sha1hash (but does not exist on all Android versions) and the password (in the accounts table) is a long string that takes different formats on different Android versions. Additionally, the GSF database has a google_login_public_key entry, which when decoded suspiciously resembles a 1024-bit RSA public key. Some more experimentation reveals that credential management works differently on pre-ICS and post-ICS devices. On pre-ICS devices, GLS stores an encrypted version of your password and posts it to the server side endpoints both when authenticating for the first time (when you add the account) and when it needs to have a token for a particular service issued. On post-ICS devices, it only posts the encrypted password the first time, and gets a 'master token' in exchange, which is then stored on the device (in the password column of the accounts database). Each subsequent token request uses that master token instead of a password.

    Let's look into the cached credential strings a bit more. The encrypted password is 133 bytes long, and thus it is a fair bet that it is encrypted with the 1024-bit (128 bytes) RSA public key mentioned above, with some extra data appended. Adding multiple accounts that use the same password produces different password strings (which is a good thing), but the first few bytes are always the same, even on different devices. It turns out those identify the encryption key and are derived by hashing its raw value and taking the leading bytes of the resulting hash. At least from our limited sample of Android devices, it would seem that the RSA public key used is constant both across Android versions and accounts. We can safely assume that its private counterpart lives on the server side and is used to decrypt sent passwords before performing the actual authentication. The padding used is OAEP (with SHA1 and MGF1), which produces random-looking messages and is currently considered secure (at least when used in combination with RSA) against most advanced cryptanalysis techniques. It also has quite a bit of overhead, which in practice means that the GLS encryption scheme can encrypt at most 86 bytes of data. The outlined encryption scheme is not exactly military-grade and there is the issue of millions of devices most probably using the same key, but recovering the original password should be sufficiently hard to discourage most attackers. However, let's not forget that we also have a somewhat friendlier SHA1 hash available. It turns out it can be easily reproduced by 'salting' the Google account password with the account name (typically GMail address) and doing a single round of SHA1. This is considerably easier to do and it wouldn't be too hard to precompute a bunch of hashes based on commonly used or potential passwords if you knew the target account name.

    Fortunately, newer version of Android (4.0 and later) no longer store this hash on the device. Instead of the encrypted password+SHA1 hash combination they store an opaque 'master token' (most probably some form of OAuth token) in the password column and exchange it for authentication tokens for different Google services. It is not clear whether this token ever expires or if it is updated automatically. You can, however, revoke it manually by going to the security settings of your Google account and revoking access for the 'Android Login Service' (and a bunch of other stuff you never use while you are at it). This will force the user to re-authenticate on the device next time it tries to get a Google auth token, so it is also somewhat helpful if you ever lose your device and don't want people accessing your email, etc. if they manage to unlock it. The service authorization token issuing protocol uses some device-specific data in addition to the master token, so obtaining only the master token should not be enough to authenticate and impersonate a device (it can however be used to login into your Google account on the Web, see the second part for details).

    Google Play Services

    Google Play Services (we'll abbreviate it to GPS, although the actual package is com.google.android.gms, guess where the 'M' came from) was announced at this year's Google I/O as an easy to use platform that offers integration with Google products for third-party Android apps. It was actually rolled out only a month ago, so it's probably not very widely used yet. Currently it provides support for OAuth 2.0 authorization to Google API's 'with a good user experience and security', as well some Google+ plus integration (sign-in and +1 button). Getting OAuth 2.0 tokens via the standard AccountManager interface has been supported for quite some time (though support was considered 'experimental') by using the special 'oauth2:scope' token type syntax. However, it didn't work reliably across different Android builds, which have different GLS versions bundled and this results in slightly different behaviour. Additionally, the permission grant dialog shown when requesting a token was not particularly user friendly, because it showed the raw OAuth 2.0 scope in some cases, which probably means little to most users (see screenshot in the first section). While some human-readable aliases for certain scopes where introduced (e.g., 'Manage your taks' for 'oauth2:https://www.googleapis.com/auth/tasks'), that solution was neither ideal, nor universally available. GPS solves this by making token issuing a two-step process (newer GLS versions also use this process):
    1. the first request is much like before: it includes the account name, master token (or encrypted password pre-ICS) and requested service, in the 'oauth2:scope' format. GPS adds two new parameters: requesting app package name and app signing certificate SHA1 hash (more on this later). The response includes some human readable details about the requested scope and requesting application, which GPS shows in a permission grant dialog like the one shown below.
    2. if the users grants the permission, this decision is recorded in the extras table in a proprietary format which includes the requesting app's package name, signing certificate hash, OAuth 2.0 scope and grant time (note that it is not using the grants table). GPS then resends the authorization request setting the has_permission parameter to 1. On success this results in an OAuth 2.0 token and its expiry date in the response. Those are cached in the authtokens table in a similar format.

    To be able to actually use a Google API, you need to register your app's package name and signing key in Google's API console. The registration lets services validating the token query Google what app the token was issued for, and thus identify the calling app. This has one subtle, but important side-effect: you don't have to embed an API key in your app and send it with every request. Of course, for a third party published app you can easily find out both the package name and the signing certificate so it is not particularly hard to get a token issued in the name of some other app (not possible via the official API, of course). We can assume that there are some additional checks on the server side that prevent this, but theoretically, if you used such a token you could, for example, exhaust a third-party app's API request quota by issuing a bunch of requests over a short period of time. 

    The actual GPS implementation seems to reuse much of the original Google Login Service authentication logic, including the password encryption method, which is still used on pre-ICS devices (the protocol is, after all, mostly the same and it needs to be able to use pre-existing accounts). On top of that it adds better OAuth 2.0 support, a version-specific account selection dialog and some prettier and more user friendly permission grant UIs. The GPS app has the Google apps shared UID, so it can directly interact with other proprietary Google services, including GLS and GSF. This allows it, among other things, to directly get and write Google account credentials and tokens to the accounts database. As can be expected, GPS runs in a remote service that the client library you link into your app accesses. The major selling point against the legacy AccountManager API is that while its underlying authenticator modules (GLS and GSF) are part of the system, and as such cannot be updated without an OTA, GPS is an user-installable app that can be easily updated via Google Play. Indeed, it is advertised as auto-updating (much like the Google Play Store client), so app developers presumably won't have to rely on users to update it if they want to use newer features (unless GPS is disabled altogether, of course). This update mechanism is to provide 'agility in rolling out new platform capabilities', but considering how much time the initial roll-out took, it is to be seen how agile the whole thing will turn out to be. Another thing to watch out for is feature bloat: besides OAuth 2.0 support, GPS currently includes G+ and AdMob related features, and while both are indeed Google-provided services, they are totally unrelated. Hopefully, GPS won't turn into a 'everything Google plus the kitchen sink' type of library, delaying releases even more. With all that said, if your app uses OAuth 2.0 tokens to authenticate to Google API's, which is currently the preferred method (ClientLogin, OAuth 1.0 and AuthSub have been officially deprecated), definitely consider using GPS over 'raw'AccountManager access.

    Summary

    Android provides a centralized registry of user online accounts via the AccountManager class. It lets you both get tokens for existing accounts without having to handle the actual credentials and register your own account type, if needed. Registering an account type gives you access to powerful system features, such as authentication token caching and automatic background synchronization. 'Google experience' devices come with built-in support for Google accounts, which lets third party apps access Google online services without needing to directly request authentication information from the user. The latest addition to this infrastructure is the recently released Google Play Services app and companion client library, which aim to make it easy to use OAuth 2.0 from third party applications. 

    We've now presented an overview of how the account management system works, and the next step is to show how to actually use it to access a real online service. That will be the topic of the second article in the series. 

    Single sign-on to Google sites using AccountManager

    $
    0
    0
    In the first part of this series, we presented how the standard Android online account management framework works and explored how Google account authentication and authorization modules are implemented on Android. In this article we will see how to use the Google credentials stored on the device to log in to Google Web sites automatically. Note that this is different from using public Google API's, which generally only requires putting an authentication token (and possibly an API key) in a request header, and is quite well supported by the Google APIs Client Library. First, some words on what motivated this whole exercise (may include some ranting, feel free to skip to the next section).

    Android developer console API: DIY

    If you have ever published an application on the Android Market Google Play Store, you are familiar with the Android developer console. Besides letting you publish and update your apps, it also shows the number of total and active installs (notoriously broken and not too be taken too seriously, though it's been getting better lately), ratings and comments. Depending on how excited about the whole app publishing business you are, you might want to check it quite often to see how your app is doing, or maybe you just like hitting F5. Most people don't however, so pretty much every developer at some point comes up with the heretic idea that there must be a better way: you should be able to check your app's statistics on your Android device (obviously!), you should get notified about changes automatically and maybe even be able to easily see if today's numbers are better than yesterday's at a glance. Writing such a tool should be fairly easy, so you start looking for an API. If your search ends up empty it's not your search engine's fault: there is none! So before you start scraping those pretty Web pages with your favourite P-language, you check if someone has done this before -- you might get a few hits, and if you are lucky even find the Android app.

    Originally developed by Timelappse, and now open source, Andlytics does all the things mentioned above, and more (and if you need yet another feature, consider contributing). So how does it manage to do all of this without an API? Through blood, sweat and a lot of protocol reversing guessing. You see, the current developer console is built on GWT which used to be Google's webstack-du-jour a few years back. GWT essentially consists of RPC endpoints at the server, called by a JavaScript client running in the browser. The serialization protocol in between is a custom one, and the specification is purposefully not publicly available (apparently, to allow for easier changes!?!). It has two main features: you need to know exactly how the transferred objects look like to be able to make any sense of it, and it was obviously designed by someone who used to write compilers for a living before they got into Web development ('string table' ring a bell?). Given the above, Andlytics was quite an accomplishment. Additionally, the developer console changing its protocol every other week and adding new features from time to time didn't really make it any easier to maintain. Eventually, the original developer had a bit too much GWT on his plate, and was kind enough to open source it, so others could share the pain.

    But there is a bright side to all this: Developer Console v2. It was announced at this year's Google I/O to much applause, but was only made universally available a couple of weeks ago (sound familiar?). It is a work in progress, but is showing promise. And the best part: it uses perfectly readable (if a bit heavy on null's) JSON to transport data! Naturally, there was much rejoicing at the Andlytics Github project. It was unanimously decided that the sooner we obliterate all traces of GWT, the better, and the next version should use the v2 console 'API'. Deciphering the protocol didn't take long, but it turned out that while to log in to the v1 console all you needed was a ClientLogin (see the next section for an explanation) token straight out of Android's AccountManger, the new one was not so forgiving and the login flow was somewhat more complex. Asking the user for their password and using it to login was obviously doable, but no one would like that, so we needed to figure out how to log in using the Google credentials already cached on the device. Android browser and Chrome are able to automatically log you in to the developer console without requiring your password, so it was clearly possible. The process is not really documented though, and that prompted this (maybe a bit too wide-cast) investigation. Which finally leads us to the topic of this post: to show how to use cached Google account credentials for single sign-on. Let's first see what standard ways are available to authenticate to Google's public services and API's.

    Google services authentication and authorization

    The official place to start when selecting an auth mechanism is the Google Accounts Authentication and Authorization page. It lists quite a few protocols, some open and some proprietary. If you research further you will find that currently all but OAuth 2.0 and Open ID are considered deprecated, and using the proprietary ones is not recommended. However, a lot of services are still using older, proprietary protocols, so we will look into some of those as well. Most protocols also have two variations: one for Web applications and one for the so called, 'installed applications'. Web applications run in a browser, and are expected to be able to take advantage of all standard browser features: rich UI, free-form user interaction, cookie store and ability to follow redirects. Installed applications, on the other hand, don't have a native way to preserve session information, and may not have the full Web capabilities of a browser. Android native applications (mostly) fall in the 'installed applications' category, so let's see what protocols are available for them.

    ClientLogin

    The oldest and most widely used till now authorization protocol for installed applications is ClientLogin. It assumes the application has access to the user's account name and password and lets you get an authorization token for a particular service, that can be saved and used for accessing that service on behalf of the user. Services are identified by proprietary service names, for example 'cl' for Google Calendar and 'ah' for Google App engine. A (non-exhaustive) list of supported service names can be found in the Google Data API reference. Here are a few Android-specific ones, not listed in the reference: 'ac2dm', 'android', 'androidsecure', 'androiddeveloper', 'androidmarket' and 'youngandroid' (probably for the discontinued App Inventor). The token can be fairly long-lived (up to two weeks), but cannot be refreshed and the application needs to obtain a new token when it expires. Additionally, there is no way to validate the token short of accessing the associated service: if you get an OK HTTP status (200), it is still valid, if 403 is returned you need to consult the additional error code and retry or get a new token. Another limitation is that ClientLogin tokens don't offer fine grained access to a service's resources: access is all or nothing, you cannot specify read-only access or access to a particular resource only. The biggest drawback for use in mobile apps though is that ClientLogin requires access to the actual user password. Therefore, if you don't want to force users to enter it each time a new token is required, it needs to be saved on the device, which poses various problems. As we saw in the previous post, in Android this is handled by GLS and the associated online service by storing an encrypted password or a master token on the device. Getting a token is as simple as calling the appropriate AccountManger method, which either returns a cached token or issues an API request to fetch a fresh one. Despite it's many limitations, the protocol is easy to understand and straightforward to implement, so it has been widely used. It has been officially deprecated since April 2012 though, and apps using it are encouraged to migrate to OAuth 2.0, but this hasn't quite happened yet. 

    OAuth 2.0

    No one likes OAuth 1.0 (except Twitter) and AuthSub is not quite suited for native applications, so we will only look at the currently recommended OAuth 2.0 protocol. OAuth 2.0 has been in the works for quite some time, but it only recently became an official Internet standard. It defines different authorization 'flows', aimed at different use cases, but we will not try to present all of them here. If you are unfamiliar with the protocol, refer to one of the multiple posts that aim to explain it at a higher level, or just read the RFC if you need the details.  And, of course, you can watch for this for a slightly different point of view. We will only discuss how OAuth 2.0 relates to native mobile applications.

    The OAuth 2.0 specification defines 4 basic flows for getting an authorization token for a resource, and the two ones that don't require the client (in our scenario an Android app) to directly handle user credentials (Google account user name and password), namely the authorization code grant flow and the implicit grant flow, both have a common step that needs user interaction. They both require the authorization server (Google's) to authenticate the resource owner (the user of the our Android app) and establish whether they grant or deny the access request for the specified scope (e.g., read-only access to profile information). In a typical Web application that runs in a browser, this is very straightforward to do: the user is redirected to an authentication page, then to a access grant page that basically says 'Do you allow app X to access data Y and Z?', and if they agree, another redirect, which includes an authorization token, takes them back to the original application. The browser simply needs to pass on the token in the next request to gain access to the target resource. Here's an official Google example that uses the implicit flow: follow this link and grant access as requested to let the demo Web app display your Google profile information. With a native app things are not that simple. It can either
    • use the system browser to handle the permission grant step, which would typically involve the following steps:
      • launch the system browser and hope that the user will finish the authentication and permission grant process
      • detect success or failure and extract the authorization token from the browser on success (from the window title, redirect URL or the cookie store)
      • ensure that after granting access, the user ends up back in your app
      • finally, save the token locally and use it to issue the intended Web API request
    • embed a WebView or a similar control in the apps's UI. Getting a token would generally involve these steps:
      • in the app's UI, instruct the user what to do and load the login/authorization page
      • register for a 'page loaded' callback, and check for the final success URL each time it's called
      • when found, extract the token from the redirect URL or the WebView's cookie jar and save it locally
      • finally use the token to send the intended API request
    Neither is ideal, both are confusing to the user and to implement the first one on Android you might event have to (temporarily) start a Web server (redirect_uri is set to http://localhost in the API console, so you can't just use a custom scheme). The second one is generally preferable, if not pretty: here's an (somewhat outdated) overview of what needs to be done and a more recent example with full source code. This integration complexity and UI impedance mismatch are the problems that OAuth 2.0 support via the AccountManager initially, and recently Google Play Services aim to solve. When using either of those, user authentication is implemented transparently by passing the saved master token (or encrypted password) to the server side component, and instead of a WebView with a permission grant page, you get the Android native access grant dialog. If you approve, a second request is sent to convey this and the returned access token is directly delivered to the requesting app. This is essentially the same flow as for Web applications, but has the advantages that it doesn't require context switching from native to browser and back, and is much more user friendly. Of course, it only works for Google accounts, so if you wanted to write, say, a Facebook client, you still have to use a WebView to process the access permission grant and get an authorization token.

    Now that we have an idea what authentication methods are available, let's see if we can use them to access an online Google service that doesn't have a dedicated API.

    Google Web properties single sign-on

    Being able to access multiple related, but separate services without needing to authenticate to each one individually is generally referred to as single sign-on (SSO). There are multiple standard ways to accomplish this for different contexts, ranging from Kerberos to SAML-based solutions. We will use the term here in a narrower meaning: being able to use different Google services (Web sites or API's) after having authenticated to only one of them (including the Android login service). If you have a fairly fast Internet connection, you might not even notice it, but after you log in to, say, Gmail, clicking on YouTube links will take you to a completely different domain, and yet you will be able to comment on that neat cat video without having to log in again. If you have a somewhat slower connection and a wide display though, you may notice that there is a lot of redirecting and long parameter passing, with the occasional progress bar going on. What happens behind the scenes is that your current session cookies and authentication tokens are being exchanged for yet other tokens and more cookies, to let you seamlessly log in to that other site. If you are curious, you can observe the flow with Chrome's built-in developer tools (or similar plugins for other browsers), or check out our sample. All of those requests and responses are essentially a proprietary SSO protocol (Google's), which is not really publicly documented anywhere, and, of course, is likely to change fairly often as Google rolls out upgrades to their services. With that said, there is a distinct pattern, and on a higher level you only have two main cases. We are deliberately ignoring the persistent cookie ('Stay signed in')  scenario for simplicity's sake.
    • Case 1: you haven't authenticated to any of the Google properties. If you access, for example, mail.google.com in that state you will get a login screen originating at https://accounts.google.com/ServiceLogin with parameters specifying the service you are trying to access ('mail' for Gmail) and where to send you after you are authenticated. After you enter your credentials, you will generally get redirected a few times around the accounts.google.com, which will set a few session cookies, common (Domain=.google.com) for all services (always SID and LSID, plus a few more). The last redirect will be to the originally requested service and include an authentication token in the redirected location (usually specified with the auth parameter, e.g.: https://mail.google.com/mail/?auth=DQAAA...). The target service will validate the token and set a few more service-specific sessions cookies, restricted by domain and path, and with the Secure and HttpOnly flags set. From there, it might take a couple of more redirects before you finally land at an actual content page.
    • Case 2: you have already authenticated to at least one service (Gmail in our example). In this state, if you open, say, Calendar, you will go through https://accounts.google.com/ServiceLogin again, but this time the login screen won't be shown. The accounts service will modify your SID and LSID cookies, maybe set a few new ones and finally redirect you the original service, adding an authentication token to the redirect location. From there the process is similar: one or more service-specific cookies will be set and you will finally be redirected to the target content.
    Those flows obviously work well for browser-based logins, but since we are trying to do this from an Android app, without requiring user credentials or showing WebView's, we have a different scenario. We can easily get a ClientLogin or an OAuth 2.0 token from the AccountManager, but since we are not preforming an actual Web login, we have no cookies to present. The question becomes: is there a way to log in with a standard token alone? Since tokens can be used with the data APIs (where available) of each service, they obviously contain enough information to authenticate us and grant access to the service's resources. What we need is an Web endpoint, that will take our token and give us a set of cookies we could use to access the corresponding Web site in exchange. Clues and traces of such a service are scattered around the Internet, mostly in the code of unofficial Google client libraries and applications. Once we know it is definitely possible, the next problem becomes getting it to work with Android's AccountManger.

    Logging in using AccountManager

    The only real documentation we could find, besides code comments and READMEs of the unofficial Google client applications mentioned above, is a short Chromium OS design document. It tells us that the standard (at the time) login API for installed applications, ClientLogin, alone is not enough to accomplish Web SSO, and outlines a three step process that lets us exchange ClientLogin tokens for session cookies valid for a particular service:
    1. Get a ClientLogin token (this we can do via the AccountManager)
    2. Pass it to https://www.google.com/accounts/IssueAuthToken, to get a one-time use, short-lived token that will authenticate the user to any service (the so called, 'ubertoken')
    3. Finally, pass the ubertoken to https://www.google.com/accounts/TokenAuth, to exchange it for the full set of browser cookies we need to do SSO
    This outlines the process, but is a little light on the details. Fortunately, those can be found in the Chromium OS source code, as well as a few other projects. After a fair bit of digging, here's what we uncovered:
      1. To get the mythical ubertoken, you need to pass the SID and LSID cookies to the IssueAuthToken endpoint like this:
        https://www.google.com/accounts/IssueAuthToken?service=gaia&Session=false&SID=sid&LSID=lsid
      2. The response will give you the ubertoken, which you pass to the TokenAuth endpoint along with the URL of the service you want to use:
        https://www.google.com/accounts/TokenAuth?source=myapp&auth=ubertoken&continue=service-URL
      3. If the token check out OK, the response will give you a URL to load. If your HTTP client is set up to follow redirects automatically, once you load it, needed cookies will be set automatically (just as in a browser), and you will finally land on the target site. As long as you keep the same session (which usually means the same HTTP client instance) you will be able to issue multiple requests, without needing to go through the authentication flow again.
      What remains to be seen is, can we implement this on Android. As usual, it turns out that there is more than one way to do it:

      The hard way

      The straightforward way would be to simply implement the flow outlined above using your favourite HTTP client library. We choose to use Apache HttpClient, which supports session cookies and multiple requests using a single instance out of the box. The first step calls for the SID and LSID cookies though, not an authentication token: we need cookies to get a token, in order to get more cookies. Since Android's AccountManager can only give us authentication tokens, and not cookies, this might seem like a hopeless catch-22 situation. However, while browsing the authtokens table of the system's accounts database earlier, we happened to notice that it actually had a bunch of tokens with type SID and LSID. Our next step is, of course, to try to request those tokens via the AccountManager interface, and this happens to work as expected:

      String sid = am.getAuthToken(account, "SID", null, activity, null, null)
      .getResult().getString(AccountManager.KEY_AUTHTOKEN);
      String lsid = am.getAuthToken(account, "LSID", null, activity, null, null)
      .getResult().getString(AccountManager.KEY_AUTHTOKEN);

      Having gotten those, the rest is just a matter of issuing two HTTP requests (error handling omitted for brevity):

      String TARGET_URL = "https://play.google.com/apps/publish/v2/";
      Uri ISSUE_AUTH_TOKEN_URL =
      Uri.parse("https://www.google.com/accounts/IssueAuthToken?service=gaia&Session=false");
      Uri TOKEN_AUTH_URL = Uri.parse("https://www.google.com/accounts/TokenAuth");

      String url = ISSUE_AUTH_TOKEN_URL.buildUpon().appendQueryParameter("SID", sid)
      .appendQueryParameter("LSID", lsid)
      .build().toString();
      HttpPost getUberToken = new HttpPost(url);
      HttpResponse response = httpClient.execute(getUberToken);
      String uberToken = EntityUtils.toString(entity, "UTF-8");
      String getCookiesUrl = TOKEN_AUTH_URL.buildUpon()
      .appendQueryParameter("source", "android-browser")
      .appendQueryParameter("auth", authToken)
      .appendQueryParameter("continue", TARGET_URL)
      .build().toString();
      HttpGet getCookies = new HttpGet(getCookiesUrl);
      response = httpClient.execute(getCookies);

      CookieStore cookieStore = httpClient.getCookieStore();
      // check for service-specific session cookie
      String adCookie = findCookie(cookieStore.getCookies(), "AD");
      // fail if not found, otherwise get page content
      String responseStr = EntityUtils.toString(entity, "UTF-8");

      This lets us authenticate to the Android Developer Console (version 2) site without requiring user credentials and we can easily proceed to parse the result and use it in a native app (warning: work in progress!) from here. The downside is that for this to work, the user has to grant access twice, for two cryptically looking token types (SID and LSID).

      Of course, after writing all of this, it turns out that the stock Android browser already has code that does it, which we could have used or at least referenced from the very beginning. Better yet, this find leads us to an yet easier way to accomplish our task. 

      The easy way

      The easy way is found right next to the Browser class referenced above, in the DeviceAccountLogin class, so we can't really take any credit for this. It is hardly anything new, but some Googling suggests that it is neither widely known nor used much. You might have noticed that the Android browser is able to silently log you in to Gmail and friends, when you use the mobile site. The way this is implemented is via the 'magic' token type 'weblogin:'. If you use it along with the service name and URL of the site you want to access, it will do all of the steps listed above automatically and instead of a token will give you a full URL you can load to get automatically logged in to your target service. This magic URL is in the format shown below, and includes both the ubertoken and the URL of the target site, as well as the service name (this example is for the Android Developer Console, line is broken for readability):

      https://accounts.google.com/MergeSession?args=service%3Dandroiddeveloper%26continue
      %3Dhttps://play.google.com/apps/publish/v2/&uberauth=APh...&source=AndroidWebLogin

      Here's how to get the MergeSession URL:

      String tokenType = "weblogin:service=androiddeveloper&"
      + "continue=https://play.google.com/apps/publish/v2/";
      String loginUrl = accountManager.getAuthToken(account,tokenType, false, null, null)
      .getResult().getString(AccountManager.KEY_AUTHTOKEN);

      This is again for the Developer Console, but works for any Google site, including Gmail, Calendar and even the account management page. The only problem you might have is finding the service name, which is hardly obvious in some cases (e.g., 'grandcentral' for Google Voice and 'lh2' for Picasa).

      It takes only a single HTTP request form Android to get the final URL, which tells us that the token issuing flow is implemented on the server side. This means that you can also use the Google Play Services client library to issue a weblogin:'token' (see screenshot below and note that unlike for OAuth 2.0 scopes, it shows the 'raw' token type). Probably goes without saying, but it also means that if you happen to come across someone's accounts.db file, all it takes to log in into their Google account(s) is two HTTPS requests: one to get the MergeSession URL, and one to log in to their accounts page. If you are thinking 'This doesn't affect me, I use Google two-factor authentication (2FA)!', you should know that in this case 2FA doesn't really help. Why? Because since Android doesn't support 2FA, to register an account with the AccountManager you need to use an application specific password (Update: On ICS and later, GLS will actually show a WebView and let you authenticate using your password and OTP. However, the OTP is not required once you get the master token). And once you have entered one, any tokens issued based on it, will just work (until you revoke it), without requiring entering an additional code. So if you value your account, keep your master tokens close and revoke them as soon as you suspect that your phone might be lost or stolen. Better yet, consider a solution that lets you wipe it remotely (which might not work after your revoke the tokens, so be sure to check how it works before you actually need it).


      As we mentioned above, this is all ClientLogin based, which is officially deprecated, and might be going away soon (EOL scheduled for April 2013). But some of the Android Google data sync feeds still depend on ClientLogin, so if you use it you would probably OK for a while. Additionally, since the weblogin: implementation is server-based, it might be updated to conform with the latest (OAuth 2.0-based?) infrastructure without changing the client-side interface. In any case, watch the Android Browser and Chormium code to keep up to date.

      Summary

      Google offers multiple online services, some with both a traditional browser-based interface and a developer-oriented API. Consequently, there are multiple ways to authenticate to those, ranging from form-based username and password login to authentication API's such as ClientLogin and OAuth 2.0. It is relatively straightforward to get an authentication token for services with a public API on Android, either using Android's native AccountManager interface or the newer Google Play Services extension. Getting the required session cookies to login automatically to the Web sites of services that do not offer an API is however neither obvious, nor documented. Fortunately, it is possible and very easy to do if you combine the special 'weblogin:' token type with the service name and the URL of the site you want to use. The best available documentation about this is the Android Browser source code, which uses the same techniques to automatically log you in to Google sites using the account(s) already registered on your device.

      Moral of the story: interoperability is so much easier when you control all parties involved.

      Viewing all 50 articles
      Browse latest View live